<![CDATA[Cristian Adam]]>2022-12-23T09:46:52+01:00https://cristianadam.eu/Octopress<![CDATA[WSLg and Qt Creator]]>2022-12-22T14:48:52+01:00https://cristianadam.eu/20221222/wslg-and-qt-creatorFor the CMake presets feature presentation in Qt Creator 9 I needed a cross platform Windows and Linux screencast.
My Windows Arm64 laptop was the perfect platform for the use case of registering a CMake preset with a self built Qt.
Quickly I found out that I only had one option to run Qt Creator as a Linux application, and that’s via Ubuntu 22.04 running under Windows Subsystem For Linux GUI (WSLg).
Also I’ve tried using Hyper-V, which WSLg under the hood uses, but the Ubuntu 22.04 image wouldn’t boot.
WSL2 and WSLg was the way to go! I’ve installed Qt Creator via sudo apt install qtcreator and then started Qt Creator via the Windows shortcut named Qt Creator (Ubuntu-22.04)!
This is a short cut for C:\Windows\System32\wslg.exe ~ -d Ubuntu-22.04 qtcreator
Qt Creator would look like this:
It’s very hard not to notice that the windows title bar looks a bit weird. The generic window icon, the mouse cursor that does strange theme changes, and the bit fat window borders!
My goal was to have Qt Creator 9 look similar on Windows 11 as a native Windows Arm64 application and as native Ubuntu 22.04 Linux application running with WSLg.
Windows native look
On Windows 11 I am using a 125% font scaling and having “Storm” (some sort of dark gray #4C4A48) as a Windows color with Show accent color on title bars and windows borders enabled.
This is how it looks below:
WSLg with Wayland
I’ve build Qt 6.4.0 and Qt Creator 9.0.1 myself. I decided to build the QtWayland module so that I can have my own compositor, with the hope that I could get the chance of fixing
some of the issues that I mentioned above.
Which looks like this:
This doesn’t look necessarily better. The application icon is there, but there are no window borders, no resize cursors (not seen in the screencast), and no window shadows. The last part is not that important, I can’t live without, but the rest. Auch.
Improving the Wayland experience
I took a shot at hacking the qtwayland/src/plugins/decorations/bradient default Wayland decoration plugin to match my Windows 11 setup.
I was pretty happy with how it looks now :heart:
In order to achieve the Windows 11 look I had to change three things:
fonts
cursor theme
Wayland “bradient” theme configuration
Fonts
Since I was running an Ubuntu Linux virtual machine on Windows and my goal was to have a similar look & feel as the Windows application, why not use the Windows fonts?
First I tried removing the Linux fonts. If you uninstall one font package Ubuntu Linux will install a fallback font package. So I had to issue multiple font removal commands:
Then I edited the /etc/fonts/local.conf file with the content:
<?xml version="1.0"?><!DOCTYPE fontconfig SYSTEM "fonts.dtd"><fontconfig><dir>/mnt/c/Windows/Fonts</dir><matchtarget="font"><editmode="assign"name="lcdfilter"><const>lcddefault</const></edit><editmode="assign"name="hinting"><bool>true</bool></edit><editmode="assign"name="hintstyle"><const>hintslight</const></edit><editmode="assign"name="rgba"><const>rgb</const></edit><editmode="assign"name="antialias"><bool>true</bool></edit></match><alias><family>sans-serif</family><prefer><family>Segoe UI</family></prefer></alias><matchtarget="pattern"><testqual="any"name="family"><string>monospace</string></test><editname="family"mode="assign"binding="same"><string>Courier New</string></edit></match><matchtarget="pattern"><testqual="any"name="family"><string>DejaVu LGC Sans</string></test><editname="family"mode="assign"binding="same"><string>Segoe UI</string></edit></match></fontconfig>
And finally I’ve updated the font database sudo fc-cache -f -v. This was my best attempt at having a Windows like font rendering with the Windows
fonts and some fonts substitutions for Qt Creator.
In order to have a bigger font in Qt Creator I had to have the following environment variable set:
QT_WAYLAND_FORCE_DPI=120
Funnily enough 125 was bigger than what Windows would set for 125%.
Cursor theme
Ubuntu 22.04 comes with a basic X11 font theme. I’ve installed one from KDE which had more cursors and looked nicer:
sudo apt install breeze-cursor-theme
Quickly I noticed that the mouse cursors are HUGE, in order to have them at proper size, I needed to have the following environment variable set:
XCURSOR_SIZE=16
Wayland “bradient” theme
First I hacked Qt Wayland’s qtwayland/src/plugins/decorations/bradient plugin with this qtwayland-6.4.0-bradient-windows11.patch. This was my first time trying to hack a theme plugin. It’s not perfect, but it’s good enough for me.
Now the plugin looks after a few environment variables in order to configure the window titlebar colors, the border colors, the alignment of the window title, and so on.
As it turns out the Windows 11 shortcut dialog has a limit on the edit line for the executable, and I was not able to pass all the parameters to the shortcut.
I had to use a WScript script to achieve this:
functionwslgLink() {
var commandArguments = "";
for (var i = 0; i < arguments.length; ++i) {
commandArguments += arguments[i] + "";
}
var shell = new ActiveXObject("WScript.Shell");
var strStartMenu = shell.SpecialFolders("StartMenu")
var shortcut = shell.CreateShortcut(strStartMenu + "\\Programs\\Qt Creator Linux.lnk")
shortcut.WindowStyle = 4;
shortcut.IconLocation = "%userProfile%\\wsl\\qtcreator.ico";
shortcut.TargetPath = "c:\\windows\\system32\\wslg.exe"
shortcut.Arguments = commandArguments;
shortcut.WorkingDirectory = "c:\\windows\\system32";
shortcut.Save()
}
wslgLink(
"-d Ubuntu-22.04",
"QT_WAYLAND_FORCE_DPI=120",
"XCURSOR_SIZE=16",
"QT_WAYLAND_DECORATION_FG_COLOR=#ffffff",
"QT_WAYLAND_DECORATION_FG_INACTIVE_COLOR=#919191",
"QT_WAYLAND_DECORATION_BG_COLOR=#4c4a48",
"QT_WAYLAND_DECORATION_BG_INACTIVE_COLOR=#f3f3f3",
"QT_WAYLAND_DECORATION_BORDER_COLOR=#4c4a48",
"QT_WAYLAND_DECORATION_BORDER_INACTIVE_COLOR=#b3b3b3",
"QT_WAYLAND_BUTTONS_HOVER_BG_COLOR=#575553",
"QT_WAYLAND_CLOSE_BUTTON_HOVER_BG_COLOR=#C42B1C",
"QT_WAYLAND_DECORATION_LEFT_WINDOW_TEXT=1",
"~/Qt/qtcreator/bin/qtcreator"
);
For a dark Windows theme the following values work better:
You can get the Qt Creator icon with a Linux overlay from here.
Conclusion
I was able to run Qt Creator 9.0.1 both for Windows 11 arm64 natively and Ubuntu 22.04 having a consistent Windows 11 look and feel! :metal:
Oh, one more thing. My Ubuntu 22.04 WSL2 installation got only 1GB of swap, which is not enough to compile LLVM / Clang for example. I had to edit the Windows %userprofile%\.wslconfig ini file with the following content:
]]><![CDATA[Windows Arm64 - Samsung Galaxy Book Go 5G]]>2022-11-26T15:57:53+01:00https://cristianadam.eu/20221126/windows-arm64-samsung-galaxy-book-go-5gWe all know the Arm CPU architecture from smartphones, which have a long battery life and passive cooling.
Apple has shown with the M1/2 laptops that you can have a laptop that kicks ass with an Arm CPU.
In November 2021 I had a look to see if there was something like that for Windows.
I found a handful of models. Microsoft Surface Pro X, Lenovo Flex 5G, Acer Spin 7 at prices between 1000 - 1500$, and lastly Samsung Galaxy Book Go 5G at 800$ (400$ on eBay).
Samsung Galaxy Book Go
In Germany I could only buy the Samsung Galaxy Book Go “European” LTE version. Which came with a Qualcomm Snapdragon (TM) 7c Gen 2 CPU, 4GB of RAM and 128GB SSD.
I bought a refurbished model for 300€.
I took 7zip and run 7z -b to benchmark for arm64, x86_64 and x86. The results are here, below you have the arm64 results:
The numbers by themselves do not mean much, but let’s compare them with the Apple M1 results from 7-cpu.com:
CPU
Compressing MIPS
Decompressing MIPS
Qualcomm 7c Gen 2
12590
16390
Apple M1
48841
45484
That’s not that good, isn’t it? Also 4GB of RAM, and 128GB SSD with no means to upgrade, made the offering a bit uncool.
Another thing that I’ve noticed was the screen quality. It wasn’t at the same level as my previous Lenovo laptops. The colors would change depending how I moved my head.
A better display could have made the Samsung Galaxy Book Go a good and inexpensive notebook.
Samsung Galaxy Book Go 5G
When I found out that Samsung sells the Samsung Galaxy Book Go 5G in USA with better specs, I ordered one from ebay.com for 475€ (70€ customs), and sent back the “European” model.
The better specs were: Qualcomm Snapdragon(TM) 8cx Gen 2, 8GB of RAM and 256 GB SSD.
That’s more like it, but it’s like half of the CPU performance of an Apple M1 :neutral_face:
‘Professional’ screen replacement
The Galaxy Book Go 5G had the same problem with the screen. I did a bit of research and found out that the are 14” LCD screens. Because of one YouTube video that showed (a different Galaxy Book) that you had to use a heat gun to replace the LCD, I decided to ask a computer repair shop in Berlin Adlershof to do the work.
Two weeks later and some :shit: from the guy (apparently he had to “cut some braces” to fit the new LCD) and 280€ later I got the laptop with a way better screen.
This should have been the end of the story, unfortunately it was just the beginning.
UI freezing
I noticed that the Windows 11 UI would freeze from time to time. Here is a video for me trying to showcase the issue.
At first I thought there was a problem with the Qualcomm Adreno 690 GPU driver. I bought a license of Treexy Driver Fusion for 20€, tested all drivers it had to offer, but the problem was still there.
The weird issue was that the stock Windows graphics driver was fine, but I had no graphics acceleration and no screen dimming anymore. Bypassing the LCD connecting to an external monitor via USB-C was fine.
Then I thought there was a problem with the EDID LCD parameters, like refresh rate and what not. It was not.
Then I decided to reinstall Windows.
Windows reinstallation #1
Windows reinstallation was not as easy as one would think. Samsung was not offering a way to download a Windows ISO image for the laptop, something that Lenovo offers.
Microsoft was also not offering an Arm64 Windows 11 ISO image for download:
The Windows 11 ISO is only available for devices with x64 processors. For ARM-based PCs, you should wait until you are notified through Windows Update that the upgrade is ready for your PC.
The internet wisdom was: look at pictures of Microsoft Surface Pro X on ebay, get a serial number and then download a recovery image.
You need a USB Ethernet adapter to get Windows update to fetch the right drivers after Windows installation. Did this, got Windows 10 to work, but no luck, the problem persisted.
Then I looked at the parameters of the LCD that the repair shop installed N140HCR-GA2, and a different LCD that used half the power N140HCE-EN2. The important part was the signal interface 20455-030E-76.
So I decided to buy a N140HCE-EN2 LCD from eBay for 84€ and 10€ for an iFixit repair kit.
Did the replacement myself and … GREAT SUCCESS. The UI freeze was gone! :tada:
Windows reinstallation #2
Because I have installed Windows via a Microsoft Surface Pro X image, and even though Windows has picked up the Samsung driver package, some things were tuned differently.
The first problem that I’ve encountered: USB-C ports were not working. This was a bummer since I had moved a 512GB M.2 drive into a USB-C enclosure.
I decided to use a different Surface Pro X serial key and recovery image.
This time the USB-C ports were working :tada:
But soon I’ve got random Windows 11 blue screens of death with the CLOCK_WATCHDOG_TIMEOUT as main culprit!
I’ve ran all the Windows 11 troubleshooters, but nothing helped. :pensive:
Since there was no way for me to get a Windows 11 clean Arm64 ISO image, I decided to order another Samsung Galaxy Book Go 5G from eBay USA for 332€ :unamused:
My idea was to get the Windows installation from the new laptop.
Clean Windows reinstallation
By using UUP Dump you can create a Arm64 ISO image. I have tried such an ISO image multiple times, but my problem was that at installation
time there was no mouse and keyboard support. I was not able to actually do the Windows installation.
While waiting for the second Galaxy Book Go 5G to arrive, I’ve tried something else. I’ve used a USB 2A hub to connect the USB with Windows 11 and a mouse and keyboard.
This actually WORKED :tada:
I was able to do a clean install of Windows 11, with USB-C port working and not having random reboots!
At installation I had to press Shift-F10 to open a command prompt window, run regedit, add the LabConfig key under HKEY_LOCAL_MACHINE\SYSTEM\Setup, add the values BypassTPMCheck, BypassRAMCheck, BypassSecureBootCheck as 1 (32 bit DWORD).
Second LCD replacement
After receiving the second Samsung Galaxy Book Go 5G I decided to replace the LCD (80€) and make some pictures this time:
Now I was also able to find out which LCD Samsung used for the Galaxy Book Go 5G, namely a B140HTN02.0. Below you
have the comparison to the LCD I picked:
Some more benchmarks
Edge running as a native Arm64 application with Speedometer2.0:
CrystalDiskMark 8.0.4:
Real life usage
I have been using the Samsung Galaxy Book Go 5G as a main laptop at home for a few months now. Mainly browsing, and RDP-ing into a Ryzen 9 machine.
But I have also built Qt Creator 9 and its dependencies: Qt 6.4 and LLVM 15.0 with it. It’s not that fast, and not having all the tools as native Arm64 doesn’t help with performance.
Microsoft did release Arm64 Visual Studio recently though.
It has a plastic feel to it, not very solid, seems more like a toy. The keyboard is not that great, but it has proper left Ctrl and Fn keys and no Print Screen key close to the right Alt key.
I had to reduce the keyboard repeat rate so that I would have lleess double kkeys.
I had to disable all touchpad gestures, because it would emit fake taps. But I got used to clicking on the low part of the touchpad.
I do like the screen and the fact that it’s a 14” device. The sad part is that you can’t upgrade anything on the device, and the CPU is not on par with what Apple has to offer.
]]><![CDATA[Speeding up C++ GitHub Actions using ccache]]>2020-01-13T22:35:38+01:00https://cristianadam.eu/20200113/speeding-up-c-plus-plus-github-actions-using-ccacheIn my previous post Using GitHub Actions with C++ and CMake I have provided
a GitHub Actions yaml configuration file for C++ projects using CMake.
Building a project on GitHub Actions means always a build from scratch, for any given change, big or small. This takes time and wastes resources unnecessarily.
By having a look at the examples of various programming languages we can see that
this is meant to cache package manager dependencies e.g. pip for python, npn for node, or gradle for java.
But, as it turns out, the caching mechanism can be used to cache compilation artifacts.
ccache
ccache (or “Ccache”) is a compiler cache. It speeds up recompilation by caching previous compilations and detecting when the same compilation is being done again. Supported languages are C, C++, Objective-C and Objective-C++.
The following yaml file excerpt will enable ccache support for GitHub Actions:
This makes sure that for every build the GitHub Actions cache key is unique. It will restore
the latest tar file containing the .ccache folder for the current configuration, and and the end of
the job it will store the updated .ccache folder in a new tar file.
This will ensure that the maximum size of the cache will be 400 MiB, will use compression, and the paths
will always be relative to the build directory.
ccache statistics are zeroed before starting the build (ccache -z), and displayed after the build (ccache -s).
Getting ccache
ccache project doesn’t have any binary releases on their github page, like CMake or ninja.
One could use brew to install ccache on macOS, apt get to install ccache on Ubuntu, but what about Windows?
I have my own ccache fork, which has three commits over the official ccache:
CMake build system - to build on Windows
GitHub Actions yaml file - for providing binary releases
Visual C++ (alpha) support - for having a cross platform caching solution
Getting ccache from my fork’s binary releases is as easy as:
I used Jean-Dominique Gascuel’s work from ccache’s PR 162.
He tried to build ccache with Visual C++, add support for it in ccache. His pull request had
161 commits, and in the end got closed :pensive:
I just needed the last part, having support for Visual C++. I am fine with a MinGW build of ccache.
At the moment I have only tested CMake with Ninja generator in Release mode, which is exactly
what I need for GitHub actions.
Debug mode is not supported since ccache should cache also the pdb files.
Precompiled headers are not supported since ccache should know about them and store the pch files.
HelloWorld project
I have updated my C++ HelloWorld GitHub Actions enabled project to use ccache.
The yaml file can be also downloaded from here.
]]><![CDATA[Using GitHub Actions with C++ and CMake]]>2019-12-22T12:42:33+01:00https://cristianadam.eu/20191222/using-github-actions-with-c-plus-plus-and-cmakeIn this post I am going to provide a GitHub Actions configuration yaml file for C++ projects using CMake.
Since CMake and Ninja have GitHub Releases, I decided to download those GitHub releases. :smile:
I used CMake as a scripting language, since the default scripting language for runners is different (bash, and powershell).
CMake can execute processes, download files, extract archives.
I have set the CC and CXX environment variables, and for MSVC, I had to run the vcvars64.bat script,
get all the environment variables, and set them for the CMake running script.
Build step
The build step involves running the CMake with --build parameter:
- name: Build
  shell: cmake -P {0}
  run: |
    set(ENV{NINJA_STATUS} "[%f/%t %o/sec] ")

    if ("${ { runner.os } }" STREQUAL "Windows" AND NOT "x${ { matrix.config.environment_script } }" STREQUAL "x")
      file(STRINGS environment_script_output.txt output_lines)
      foreach(line IN LISTS output_lines)
        if (line MATCHES "^([a-zA-Z0-9_-]+)=(.*)$")
          set(ENV{${CMAKE_MATCH_1} } "${CMAKE_MATCH_2}")
        endif()
      endforeach()
    endif()

    execute_process(
      COMMAND ${ { steps.cmake_and_ninja.outputs.cmake_dir } }/cmake --build build
      RESULT_VARIABLE result
    )
    if (NOT result EQUAL 0)
      message(FATAL_ERROR "Bad exit status")
    endif()
I set the NINJA_STATUS variable, to see how fast the compilation is in the respective runners.
For MSVC I reused the environment_script_output.txt script from the Configure step.
Run tests step
This step calls ctest with number of cores passed as -j argument:
- name: Run tests
  shell: cmake -P {0}
  run: |
    include(ProcessorCount)
    ProcessorCount(N)

    execute_process(
      COMMAND ${ { steps.cmake_and_ninja.outputs.cmake_dir } }/ctest -j ${N}
      WORKING_DIRECTORY build
      RESULT_VARIABLE result
    )
    if (NOT result EQUAL 0)
      message(FATAL_ERROR "Running tests failed!")
    endif()
Install, pack, upload steps
This steps involve running CMake with --install, then creating a tar.xz archive with CMake, and
uploading it as a build artifact.
This looks complicated, but it’s needed since actions/create-release needs to be called only once, otherwise it will
fail. See issue #14, issue #27 for
more information.
Even though you can use a workflow for 6 hours, the secrets.GITHUB_TOKEN expires in one hour. You can either create a personal token, or
upload the artifacts manually to the release. See this GitHub community
thread for more information.
Closing
Enabling GitHub Actions on your CMake project is as easy at creating a .github/workflows/build_cmake.yml file with the content from
build_cmake.yml.
You can see the GitHub Actions at my Hello World GitHub project.
]]><![CDATA[Building multiple configurations with CMake in one go!]]>2019-10-12T23:20:41+02:00https://cristianadam.eu/20191012/building-multiple-configurations-with-cmake-in-one-go
Coming from other build systems to CMake one will quickly learn that
CMake can build only one configuration at a time. In practice
you need to set up multiple build directories and configure/build
with CMake for each and every one.
Autotools can do static and shared builds of libraries. For CMake
most of the project would do a static build, then a shared build
by setting the CMake variable BUILD_SHARED_LIBS to ON.
QMake can do debug and release builds at the same time, and as
we can read at Qt for Android better than ever before,
it can configure multiple Android architecture configurations
at the same time.
What can we do to get the same level of convenience with CMake?
Shared and static
CMake needs to have unique target names, so if we would have to
build a shared and static build we would need to have different
target names.
Since we need to build the same library twice, but with only
one cmake --build invocation, it would mean that CMake needs
to call itself.
That’s it what I’m going to do. Build the same source directory
in two different build directories. The add_subdirectory CMake
command allows a second parameter for a build directory.
Here is what’s needed to have a library build itself shared
and static:
cmake_minimum_required(VERSION 3.9)

project(lib LANGUAGES CXX)

if (NOT ${PROJECT_NAME}-MultiBuild)
  set(${PROJECT_NAME}-MultiBuild ON)

  macro (setup_library library_name build_type)
    set(LIBNAME ${library_name})
    set(LIBTYPE ${build_type})

    add_subdirectory(
      ${CMAKE_CURRENT_SOURCE_DIR}
      build-${build_type}
    )
  endmacro()

  setup_library(${PROJECT_NAME}_s STATIC)
  setup_library(${PROJECT_NAME} SHARED)

  return()
endif()

# The normal CMake library code goes here

add_library(${LIBNAME} ${LIBTYPE} lib.cpp)
Debug and release
If we apply the same idea to a debug and release build, we have:
cmake_minimum_required(VERSION 3.9)

project(lib LANGUAGES CXX)

if (NOT ${PROJECT_NAME}-MultiBuild)
  set(${PROJECT_NAME}-MultiBuild ON)

  macro (setup_library library_name build_type)
    set(LIBNAME ${library_name})
    set(CMAKE_BUILD_TYPE ${build_type})

    add_subdirectory(
      ${CMAKE_CURRENT_SOURCE_DIR}
      build-${build_type}
    )
  endmacro()

  setup_library(${PROJECT_NAME}_d Debug)
  setup_library(${PROJECT_NAME} Release)

  return()
endif()

# The normal CMake library code goes here

add_library(${LIBNAME} lib.cpp)
This will work with command line generators like Ninja or Makefiles,
but it won’t work with multi-config generators like Visual Studio.
Debug and release for Visual Studio
In order to get Visual Studio to produce a debug and release mode,
we need to be able to invoke CMake with separate --config <CONFIG>
values for Debug and Release.
Even if we fiddle with CMAKE_CONFIGURATION_TYPES
the above method is not enough. msbuild will fail to build.
We need to get independent CMake runs on the same source code. Luckily CMake
provides us with ExternalProject module.
ExternalProject is meant for software downloaded from the internet, but
it also works fine with existing source code :smile:
I needed to restrict the CMAKE_CONFIGURATION_TYPES only for the needed configuration,
and to have a custom BUILD_COMMAND, INSTALL_COMMAND, and to install the library.
At the end in the build directory I’ve got a lib directory containing the two libraries.
If you have multiple libraries depending on each other, you will have to have proper
CMake packages for
the libraries, and set the appropriate CMAKE_PREFIX_PATH values.
Android multi architecture
In order to test the same setup for Android, I am assuming you have the Android NDK
somewhere in your system.
I configured and build the project from a Windows command prompt window like this:
I only needed to pass the ANDROID_ABI, and CMAKE_TOOLCHAIN_FILE variables.
Conclusion
With the technique presented here CMake can easily do multiple configuration
builds in one go! :metal:
]]><![CDATA[Bundling together static libraries with CMake]]>2019-05-01T15:31:53+02:00https://cristianadam.eu/20190501/bundling-together-static-libraries-with-cmakeIn this article I’m going to talk about building a C++ library with CMake, but it won’t be a CMake tutorial.
Let’s say you have a C++ library which depends upon a few open source libraries, which have a CMake project structure,
but not necessarily done by the book (which means that they get only get built, and not deployed / installed)
Your library will include tests (unit-tests / integration tests), and the deployment can be just packing the headers and the binaries together in a tar.gz file.
This is not necessarily by the book, but it will do the job, and it could fit into any build system that the client has.
A book that one can use to do CMake right is Profesional CMake.
Awesome CMake also has a great list of resources regarding CMake.
Coming back to the C++ library, which decisions do we take to build it? Shared library, static library, both?
Shared library
The most common decision is to build as a shared library (BUILD_SHARED_LIBS set to TRUE in the CMake script).
The open source dependencies could be also shared libraries, or static libraries. If they are shared libraries you need to take care of deployment.
Sometimes you might be forced to compile them as shared libraries, due to licensing for example.
It’s all good, until you have to deal with operating systems like QNX, which has a problem with shared libraries that have lots of symbols.
The problem is that it takes longer to load them.
The default GCC and Clang compilers will compile all symbols (functions, classes, global variables) with default visibility. The Visual C++ compiler does the opposite,
it hides all the symbols.
You might be familiar with macros like MY_LIB_API which might look like this:
This will ensure that your shared library will contain only the MY_LIB_API symbols. This also means that you won’t have any problems with visible
symbols from any open source libraries that you linked statically. Hopefully you can control how that open source libraries decide how to export their symbols.
The generated shared object will also be smaller in size. It depends upon the number of symbols though.
But now you will notice that your tests will fail to build, since the symbols they require are not there anymore. So what now?
Shared and static library
We need to have a shared library with only the MY_LIB_API symbols exported, but also have tests working.
The problem with visibility flags is that it will affect the compiler command line, CMAKE_CXX_VISIBILITY_PRESET,
and CMAKE_VISIBILITY_INLINES_HIDDEN will result in having -fvisibility=hidden and -fvisibility-inlines-hidden
added to the compiler command line.
So we compile a shared library with all symbols, and one with only the MY_LIB_API symbols. But this means compiling
twice, which is a bit wasteful.
We could compile a static library with hidden symbols, then create a shared library based on this static library,
and link the tests to the static library. The tests will link because the symbols are there in the static library,
marked hidden, but still accessible to the linker.
You will have to take care of the POSITION_INDEPENDENT_CODE
CMake property, which is not set for static libraries.
This solves it. Everything works. But what if you want to make the QNX case even faster? (by removing the shared library all together!)
Static library
We could just build only the static library, with hidden visibility and ship that. But this also means everything (including client code)
needs to be compiled with the same compiler / toolchain.
The problem lies with the open source library dependencies. They also need to be shipped along side with your library,
and then the client code needs to link them too.
If you export your CMake targets, you can have the dependencies “linked” to your target, and the client code will only
have to specify one target. But this requires proper CMake exports! :smile:
Bundled static library
What if you could bundle the open source dependencies in the static library?
ar -M <<EOM
    CREATE libALL.a
    ADDLIB libA.a
    ADDLIB libB.a
    SAVE
    END
EOM
You need to run a script which does this, but wouldn’t it be nice if we had a CMake function which enumerates the
dependencies and bundles them into one library?
Another benefit of a static library is that you could provide a build with Interprocedural Optimization / Link Time Optimization (IPO/LTO)
enabled, and then the client code will generate smaller, faster binaries.
]]><![CDATA[Speeding up libclang on Windows]]>2019-03-18T21:39:30+01:00https://cristianadam.eu/20190318/speeding-up-libclang-on-windows
In this article I am revisting an article from three years ago: “Speeding up libclang on Windows”,
in which I was having a look at how the experimental Clang Code Model was handling a particular source code file.
With the help of Profile Guided Optimization I was able to go down from 10 seconds to 6 seconds.
In the meantime the Clang Code Model has been enabled by default in Qt Creator 4.7.
Three years ago I tested Qt Creator 3.6.0, Qt 5.5.1, LLVM/Clang 3.6.2, MinGW GCC 5.3.0, Visual C++ 2013/5.
I tested on a Lenovo W510 Thinkpad with an “Intel(R) Core (TM) i7 CPU M 620 @ 2.67 GHz” CPU.
Now I am going to test Qt Creator 4.8.2, Qt 5.12.2, LLVM/Clang 7.0.1, MinGW GCC 7.3.0, and Visual C++ 2017.
I upgraded my laptop to a Lenovo A485 Thinkpad with an “AMD Ryzen 7 Pro 2700U w/ Radeon Vega Mobile Gfx 2.20 GHz” CPU.
How many seconds would it take libclang to parse the file? TL;DR? 3 seconds!
Setting up the development environment
Since my A485 Thinkpad was brand new I had to set up my development environment.
It was nice not to hunt for MinGW GCC builds. This package comes with everything. Well, almost everything. One needs to get the cdb.exe debuggers to be able to debug
Visual C++ projects in Qt Creator.
Because I had installed Visual Studio 2017 community, I only had to go to Control Panel to “Programs and Features” and “Change” the
“Windows Software Development Kit - Windows 10.0.17763.132” and select the “Debugging Tools for Windows”.
It is very nice to have Qt with batteries included (MinGW GCC compiler, GDB Debugger, and Qt libraries)!
Building libclang
Now to see how the Ryzen CPU performs at compiling a project like LLVM/Clang.
I downloaded LLVM and clang source packages, unpacked them like this (using Git Bash):
$ tar xf llvm-7.0.1.src.tar.xz
$ tar xf cfe-7.0.1.src.tar.xz
$ mv cfe-7.0.1.src llvm-7.0.1.src/tools/clang
And run the following CMake cmd script (from the appropriate cmd shell):
Visual C++ 2017 64 bit: 43m:36s for the libclang target, and 22m:27s for install
MinGW 7.3.0 64 bit: 52m:43s for the libclang target, and 22m:02s for install
Three years ago on my old laptop it took like 20m to build the libclang target.
I guess the Clang code base got bigger, and the C++ compilers got complexer. But then again I have more, and faster CPU cores on this laptop than the old one. Hmmm.
libclang compilation with GCC
While compiling I noticed in “Task Manager” that the CPU speed was fluctuating, even though I selected “High Performance Mode” in Lenovo’s tools.
I though I should visit the BIOS settings, where I disabled the “AMD PowerNow!” feature in Bios.
Now the MinGW 7.3.0 64bit results are: 51m:13s for the libclang target, and 20m:00s for the install target.
The results are only a bit better. I also had the Real-time Windows Defender protection, and the search indexing for the C: drive disabled.
Since I have a dual boot system (two encrypted SSDs), I tried the same setup on my KDE Neon (Ubuntu 18.04 LTS based) Linux.
The GCC 7.3.0 build results were: 27m:22s for the libclang target, and 10m:33s.
I knew that GCC is optimized on Linux, but almost twice as fast?!
AMD Power Slider
While compiling on Windows I noticed that the “Task Manager” was showing the CPU usage not as 100%. On Linux there the “Task Manager” was showing 100%.
So I had closer look at Windows power options in Control Panel, and found the “AMD Power Slider”, which I set for “Best performance” while plugged in.
How does the “Best performance” look like?
Visual C++ 2017 64 bit: 34m:30s for the libclang target, and 14m:02s for install
MinGW 7.3.0 64 bit: 34m:03s for the libclang target, and 13m:52s for install
The result are waaaaaay better. Both compilers seem to have similar performance, but less than what I got on Linux.
RAM Drive
I had (crazy) idea, how about a RAM Drive? I took the ImDisk Toolkit, created a 512MB drive, then run a benchmark:
The RAM Drive is a few times faster than my SSD Drive!
I copied the whole mingw730_64 (450MiB) folder to R: and ran the compilation. The results were: 32m:42s for libclang target, and 12m:35s for the install target.
The results are not what one would expect, which shows that Windows is caching the read files. Well, duh!
Setting up Lyx
I took Lyx from git, and I had to download the lyx-windows-deps-msvc2015.zip manually,
since the Lyx’s CMake machinery doesn’t work out of the box. I also had to comment the include("${TOP_CMAKE_PATH}/LyxPackaging.cmake") line, which assumed different things on MinGW.
I used this script to configure the project and then import it in Qt Creator.
I configured two builds, one with Visual C++ and one with MinGW “kits”, then imported the builds in Qt Creator.
Clang parsing of Text3.cpp
Then I went to set the QT_LOGGING_RULES=qtc.clangbackend.timers=true environment variable, which should make Qt Creator to display logging
information in the DebugView tool.
Nothing was displayed in DebugView. It took me a while to find out why :smile:
Qt Logging stops sending messages to the platform’s preferred logging mechanism if you have message handler installed.
For the optimization part, I failed to come up with a toolchain file, due to the fact that I
need to reuse an already configured CMake project, and my attempts to have a clean solution failed.
Then I manually replaced in build.ninja:
For Visual C++: /LTCG:PGINSTRUMENT with /LTCG:PGOPTIMIZE
For MinGW: -fprofile-generate with -fprofile-use -Wno-error=coverage-mismatch
Visual C++ 2017 PGO instrumentation resulted in a whooping build directory size of 27.8GiB,
from 1.58GiB which was the size of the regular build.
Also the instrumented binary is like an order of magnitude slower (~60seconds), while the MinGW counterpart was not that bad (~9seconds).
I’m approximating because I haven’t saved the instrumentation DebugView results.
Clang build of libclang
I also gave Clang 7.0.1 64 bit build a try. My build script changed a bit:
set PATH=c:\Program Files\LLVM\bin\;%PATH%
set INCLUDE=c:\Program Files\LLVM\lib\clang\7.0.1\include;%INCLUDE%
set CC=clang-cl
set CXX=clang-cl
cmake ^
  -B llvm-7.0.1.build ^
  -S llvm-7.0.1.src ^
  -G "Ninja" ^
  -DCMAKE_BUILD_TYPE=Release ^
  -DCMAKE_INSTALL_PREFIX=c:\llvm ^
  -DLLVM_TARGETS_TO_BUILD=X86

cmake -E time ^
  cmake --build llvm-7.0.1.build --target libclang

cmake -E time ^
  cmake --build llvm-7.0.1.build --target install
The build times were: 44m:04s for libclang target, and 16m:36s for the install target.
“AMD Power Slider” was still at best performance, but I enabled back “AMD PowerNow!”. Hmm.
Clang also has PGO support. The CMake instrumentation toolchain looked like this:
Unfortunately the instrumentation build failed, with lots of errors like:
AsmWriterInst.cpp.obj : error LNK2001: unresolved external symbol __llvm_profile_register_names_function
Attributes.cpp.obj : error LNK2001: unresolved external symbol __llvm_profile_register_names_function
As it turns out, CMake cannot use clang.exe and clang++.exe from the official LLVM/Clang windows distribution
with a MinGW compiler, as explained in the #18880 CMake issue:
I also tried my MinGW 64 Clang build as a Clang C++ compiler. Unfortunately CMake didn’t like it either. Different error.
Clang produced slightly bigger binaries than Visual C++, slightly faster than a normal Visual C++ build, but slower than
a Visual C++ PGO build. Will the Clang PGO build beat the Visual C++ PGO build? I will give it a go some day, but not today :smile:
Results, Results, Results
The results from below are the median values of ten Text3.cpp file open, then wait for parsing.
I included also a run of my MinGW64 PGO build with the %temp% folders in the RAM Drive.
Compiler
Time to compile
Binary size
Visual C++ kit
MinGW kit
Qt Creator clang official 64
-
89.2 MiB
4227.7 ms
3358.8 ms
Visual C++ 2017 64
34m:30s
27.1 MiB
5417.7 ms
4373.5 ms
Visual C++ 2017 64 PGO
47m:15s+
21.6 MiB
4573.4 ms
3816.7 ms
Clang 7.1.0 64
44m:04s
31.3 MiB
5181.1 ms
4213.4 ms
MinGW 7.3.0 64
32m:42s
53.4 MiB
4652.3 ms
4191.8 ms
MinGW 7.3.0 64 PGO
1h:48m:46s+
46.9 MiB
4317.5 ms
3467.9 ms
MinGW 7.3.0 64 PGO RAM Drive
1h:48m:46s+
46.9 MiB
4252.1 ms
3123.0 ms
Compared with the results from three years ago, the compile times have increased, the binary files have increased,
but running times have decreased! I assume mostly due to faster hardware.
Did I mention that Qt Creator is shipping a PGO optimized version of libclang.dll on Windows? :metal:
Hardware
I bought my Lenovo A485 at the end of 2018, got a nice price offer. I tried the Lenovo A485 configurator again, this time with 32GB of RAM.
I have 16GB (2x8GB), thus I can’t actually use a bigger RAM Drive and put the
whole Visual C++ and Microsoft Windows SDKs there. ImDisk Toolkit lets you to preload a disk image!
The following Lenovo A485 Thinkpad:
CPU: AMD Ryzen 7 PRO 2700U (2MB Cache, up to 3.8 GHz)
OS: Windows 10 Pro 64
Screen: 35.6cm (14.0”) FHD (1920x1080), IPS, without Touch
Internal Battery: 3 cells Lithium-Ion 24Wh
Back battery: 6 cells Lithium-Ion 72Wh
Power supply: 65 Watt
Wifi: Realtek RTL8822BE 802.11ac WLAN with Bluetooth
RAM: 32 GB(2x 16GB) DDR4 2.400 MHz SODIM
Graphics: AMD Radeon Vega
Camera: 720p-HD with ThinkShutter
HDD: 512 GB SSD, M.2 2280, PCIe, OPLAL 2.0
Costs (in Germany) 2010,06€, but with a price deduction of 361,81€ ends up to cost 1648,25€.
]]><![CDATA[Modifying the default CMake build types]]>2019-02-23T17:43:47+01:00https://cristianadam.eu/20190223/modifying-the-default-cmake-build-typesCMake has for single configuration configurators the following build types (configuration):
Empty (Qt Creator wrongly refers to this as “Default”)
Debug
Release
RelWithDebInfo – Release with debug information, needed for profiling / post mortem debugging
MinSizeRel – Release optimized for size, and not for speed.
If we have a look at CMake’s Modules/Compiler/GNU.cmake we can see:
The empty build type usually contains the common build flags for all build types. It is generated from
the CMAKE_C_FLAGS_INIT / CMAKE_CXX_FLAGS_INIT variables, and the CFLAGS / CXXFLAGS system environment variables.
But in the case of an IDE like Qt Creator makes no sense to have, you will end up for GCC with a
-O0 (Debug) build. I’ve opened QTCREATORBUG-22013 in this regard.
CMake uses the CMAKE_<LANG>_FLAGS_<CONFIG>_INIT
variables which will be used to populate the CMAKE_CMAKE_<LANG>_FLAGS_<CONFIG> variables.
There are cases when you might want to change the default build types:
Want to have -g1 for RelWithDebInfo, because your binaries are becoming too big
Want to enable all possible warnings from the compiler
Lastly, we want to do all this without putting if clauses in the code, and manually changing the CMAKE_<LANG>_FLAGS variables.
The rule of thumb is: if you have to change compiler flags, you should do it in a toolchain file!
Writing a CMake toolchain file
If we read the CMake documentation about writing a toolchain,
we can see how easy is to write such a toolchain file. You pass the path to the compiler, while CMake will do autodetection for you.
This works fine for GNU GCC / Clang / Visual C++ compilers.
Here is what you have to set for using clang as a cross compiler for Arm platform:
There is nothing about CMAKE_<LANG>_FLAGS_<CONFIG>, because it is assumed we are using the defaults. If one needs to add something
special to CMAKE_<LANG>_FLAGS_<CONFIG> variable, you are supposed to use the CMAKE_<LANG>_FLAGS_<CONFIG>_INIT variables.
Android NDK Toolchain
The Android NDK CMake toolchain wants to have for Release build type debugging information enabled, and the -O2 compilation flag,
while the default CMake Release build type is using -O3. Basically having the default CMake RelWithDebInfo build type.
Which is then followed by (edited a bit for brevity):
# Set or retrieve the cached flags.
# This is necessary in case the user sets/changes flags in subsequent
# configures. If we included the Android flags in here, they would get
# overwritten.
set(CMAKE_C_FLAGS ""
  CACHE STRING "Flags used by the compiler during all build types.")
set(CMAKE_CXX_FLAGS ""
  CACHE STRING "Flags used by the compiler during all build types.")
set(CMAKE_C_FLAGS_DEBUG ""
  CACHE STRING "Flags used by the compiler during debug builds.")
set(CMAKE_CXX_FLAGS_DEBUG ""
  CACHE STRING "Flags used by the compiler during debug builds.")
set(CMAKE_C_FLAGS_RELEASE ""
  CACHE STRING "Flags used by the compiler during release builds.")
set(CMAKE_CXX_FLAGS_RELEASE ""
  CACHE STRING "Flags used by the compiler during release builds.")

set(CMAKE_C_FLAGS             "${ANDROID_COMPILER_FLAGS} ${CMAKE_C_FLAGS}")
set(CMAKE_CXX_FLAGS           "${ANDROID_COMPILER_FLAGS} ${ANDROID_COMPILER_FLAGS_CXX} ${CMAKE_CXX_FLAGS}")
set(CMAKE_C_FLAGS_DEBUG       "${ANDROID_COMPILER_FLAGS_DEBUG} ${CMAKE_C_FLAGS_DEBUG}")
set(CMAKE_CXX_FLAGS_DEBUG     "${ANDROID_COMPILER_FLAGS_DEBUG} ${CMAKE_CXX_FLAGS_DEBUG}")
set(CMAKE_C_FLAGS_RELEASE     "${ANDROID_COMPILER_FLAGS_RELEASE} ${CMAKE_C_FLAGS_RELEASE}")
set(CMAKE_CXX_FLAGS_RELEASE   "${ANDROID_COMPILER_FLAGS_RELEASE} ${CMAKE_CXX_FLAGS_RELEASE}")
The comment in the above code shows some problems one might have while editing CMAKE_<LANG>_FLAGS_<CONFIG> variables.
Static linking to CRT with Visual C++
On Windows CMake has selected dynamic linking to the CRT for its build types, namely the /MD compiler flag.
But what if we want to link statically to the CRT with the /MT compiler flag, thus avoiding the need of
deploying the CRT runtime on older Windows versions?
Here is what Google Test is doing in its googletest/cmake/internal_utils.cmake:
# Tweaks CMake's default compiler/linker settings to suit Google Test's needs.
#
# This must be a macro(), as inside a function string() can only
# update variables in the function scope.
macro(fix_default_compiler_settings_)
  if (MSVC)
    # For MSVC, CMake sets certain flags to defaults we want to override.
    # This replacement code is taken from sample in the CMake Wiki at
    # http://www.cmake.org/Wiki/CMake_FAQ#Dynamic_Replace.
    foreach (flag_var
             CMAKE_CXX_FLAGS CMAKE_CXX_FLAGS_DEBUG CMAKE_CXX_FLAGS_RELEASE
             CMAKE_CXX_FLAGS_MINSIZEREL CMAKE_CXX_FLAGS_RELWITHDEBINFO)
      if (NOT BUILD_SHARED_LIBS AND NOT gtest_force_shared_crt)
        # When Google Test is built as a shared library, it should also use
        # shared runtime libraries.  Otherwise, it may end up with multiple
        # copies of runtime library data in different modules, resulting in
        # hard-to-find crashes. When it is built as a static library, it is
        # preferable to use CRT as static libraries, as we don't have to rely
        # on CRT DLLs being available. CMake always defaults to using shared
        # CRT libraries, so we override that default here.
        string(REPLACE "/MD" "-MT" ${flag_var} "${${flag_var}}")
      endif()

      # We prefer more strict warning checking for building Google Test.
      # Replaces /W3 with /W4 in defaults.
      string(REPLACE "/W3" "/W4" ${flag_var} "${${flag_var}}")
    endforeach()
  endif()
endmacro()
This means that you need to call this macro in your CMake code, and that it will affect
the compilation of all subsequent targets.
This unfortunately only works starting with CMake version 3.11, released in March 2018!
CMake 3.11 has gathered the generation of all config variable generation in one function.
This is an internal function, and it’s functionality has not been documented in the 3.11 release notes.
We have the variable CMAKE_NOT_USING_CONFIG_FLAGS
documented, variable which is used in the cmake_initialize_per_config_variable function.
cmake_initialize_per_config_variable will be called at the point of generating the CMAKE_<LANG>_FLAGS_<CONFIG>, which is done after the toolchain code has been
processed.
CMake versions lower than 3.11
The CMAKE_<LANG>_FLAGS_<CONFIG>_INIT variables are defined in different places, for Clang / GCC you have them in Modules/Compiler/GNU.cxx, for Visual C++ they
are in Modules/Platform/Windows-MSVC.cmake. They are also defined with string(APPEND, which means that they will overpower your toolchain versions.
I am mentioning this because you might get something like this working for GNU like compilers for CMake versions lower than 3.11:
include(Compiler/GNU)

foreach(lang C CXX ASM)
  # Make sure that the CMAKE_<LANG>_FLAGS_RELEASE_INIT has been generated by CMake
  __compiler_gnu(${lang})

  string(REPLACE "-O3" "-O2 -g" CMAKE_${lang}_FLAGS_RELEASE_INIT "${CMAKE_${lang}_FLAGS_RELEASE_INIT}")
endforeach()

# Ignore CMake's own calls later after toolchain has been processed
macro(__compiler_gnu lang)
endmacro()
But this will partially work for Visual C++. Compiler feature detection won’t be working, etc. :pensive:
With cmake_initialize_per_config_variable you can replace / modify the CMAKE_<LANG>_FLAGS_<CONFIG>_INIT values at will.
Android NDK toolchain patch
Armed with this information, I decided to hack the Android NDK toolchain. Below you have the patch:
diff -Naur cmake/android.toolchain.cmake cmake-3.11/android.toolchain.cmake--- cmake/android.toolchain.cmake 2019-02-21 21:12:32.303346658 +0100+++ cmake-3.11/android.toolchain.cmake 2019-02-21 21:41:46.985539190 +0100@@ -35,7 +35,9 @@
# ANDROID_DISABLE_FORMAT_STRING_CHECKS
# ANDROID_CCACHE
-cmake_minimum_required(VERSION 3.6.0)+cmake_minimum_required(VERSION 3.11)++include_guard(GLOBAL)
# Inhibit all of CMake's own NDK handling code.
set(CMAKE_SYSTEM_VERSION 1)
@@ -578,48 +580,6 @@
endif()
-# Set or retrieve the cached flags.-# This is necessary in case the user sets/changes flags in subsequent-# configures. If we included the Android flags in here, they would get-# overwritten.-set(CMAKE_C_FLAGS ""- CACHE STRING "Flags used by the compiler during all build types.")-set(CMAKE_CXX_FLAGS ""- CACHE STRING "Flags used by the compiler during all build types.")-set(CMAKE_ASM_FLAGS ""- CACHE STRING "Flags used by the compiler during all build types.")-set(CMAKE_C_FLAGS_DEBUG ""- CACHE STRING "Flags used by the compiler during debug builds.")-set(CMAKE_CXX_FLAGS_DEBUG ""- CACHE STRING "Flags used by the compiler during debug builds.")-set(CMAKE_ASM_FLAGS_DEBUG ""- CACHE STRING "Flags used by the compiler during debug builds.")-set(CMAKE_C_FLAGS_RELEASE ""- CACHE STRING "Flags used by the compiler during release builds.")-set(CMAKE_CXX_FLAGS_RELEASE ""- CACHE STRING "Flags used by the compiler during release builds.")-set(CMAKE_ASM_FLAGS_RELEASE ""- CACHE STRING "Flags used by the compiler during release builds.")-set(CMAKE_MODULE_LINKER_FLAGS ""- CACHE STRING "Flags used by the linker during the creation of modules.")-set(CMAKE_SHARED_LINKER_FLAGS ""- CACHE STRING "Flags used by the linker during the creation of dll's.")-set(CMAKE_EXE_LINKER_FLAGS ""- CACHE STRING "Flags used by the linker.")--set(CMAKE_C_FLAGS "${ANDROID_COMPILER_FLAGS} ${CMAKE_C_FLAGS}")-set(CMAKE_CXX_FLAGS "${ANDROID_COMPILER_FLAGS} ${ANDROID_COMPILER_FLAGS_CXX} ${CMAKE_CXX_FLAGS}")-set(CMAKE_ASM_FLAGS "${ANDROID_COMPILER_FLAGS} ${CMAKE_ASM_FLAGS}")-set(CMAKE_C_FLAGS_DEBUG "${ANDROID_COMPILER_FLAGS_DEBUG} ${CMAKE_C_FLAGS_DEBUG}")-set(CMAKE_CXX_FLAGS_DEBUG "${ANDROID_COMPILER_FLAGS_DEBUG} ${CMAKE_CXX_FLAGS_DEBUG}")-set(CMAKE_ASM_FLAGS_DEBUG "${ANDROID_COMPILER_FLAGS_DEBUG} ${CMAKE_ASM_FLAGS_DEBUG}")-set(CMAKE_C_FLAGS_RELEASE "${ANDROID_COMPILER_FLAGS_RELEASE} ${CMAKE_C_FLAGS_RELEASE}")-set(CMAKE_CXX_FLAGS_RELEASE "${ANDROID_COMPILER_FLAGS_RELEASE} ${CMAKE_CXX_FLAGS_RELEASE}")-set(CMAKE_ASM_FLAGS_RELEASE "${ANDROID_COMPILER_FLAGS_RELEASE} ${CMAKE_ASM_FLAGS_RELEASE}")-set(CMAKE_SHARED_LINKER_FLAGS "${ANDROID_LINKER_FLAGS} ${CMAKE_SHARED_LINKER_FLAGS}")-set(CMAKE_MODULE_LINKER_FLAGS "${ANDROID_LINKER_FLAGS} ${CMAKE_MODULE_LINKER_FLAGS}")-set(CMAKE_EXE_LINKER_FLAGS "${ANDROID_LINKER_FLAGS} ${ANDROID_LINKER_FLAGS_EXE} ${CMAKE_EXE_LINKER_FLAGS}")-
# Compatibility for read-only variables.
# Read-only variables for compatibility with the other toolchain file.
# We'll keep these around for the existing projects that still use them.
@@ -686,3 +646,34 @@
set(CMAKE_ANDROID_ARM_MODE ${ANDROID_ARM_MODE})
endif()
endif()
++include(CMakeInitializeConfigs)++function(cmake_initialize_per_config_variable _PREFIX _DOCSTRING)++ if (_PREFIX MATCHES "CMAKE_(C|CXX|ASM)_FLAGS")+ set(CMAKE_${CMAKE_MATCH_1}_FLAGS_INIT "${ANDROID_COMPILER_FLAGS}")++ foreach (config DEBUG RELEASE)+ set(CMAKE_${CMAKE_MATCH_1}_FLAGS_${config}_INIT "${ANDROID_COMPILER_FLAGS_${config}}")+ endforeach()++ # Append the ANDROID_COMPILER_FLAGS_CXX flags+ if (DEFINED ANDROID_COMPILER_FLAGS_${CMAKE_MATCH_1})+ string(APPEND CMAKE_${CMAKE_MATCH_1}_FLAGS_INIT " ${ANDROID_COMPILER_FLAGS_${CMAKE_MATCH_1}}")+ endif()+ endif()++ if (_PREFIX MATCHES "CMAKE_(SHARED|MODULE|EXE)_LINKER_FLAGS")+ foreach (config SHARED MODULE EXE)+ set(CMAKE_${config}_LINKER_FLAGS_INIT "${ANDROID_LINKER_FLAGS}")++ # Append the ANDROID_LINKER_FLAGS_EXE flags+ if (DEFINED ANDROID_LINKER_FLAGS_${config})+ string(APPEND CMAKE_${config}_LINKER_FLAGS_INIT " ${ANDROID_LINKER_FLAGS_${config}}")+ endif()+ endforeach()+ endif()++ _cmake_initialize_per_config_variable(${ARGV})+endfunction()
The new code involves a bit more time to figure out what it does, but you have the benefit of having
in the CMakeCache.txt the CMAKE_<LANG>_FLAGS_<CONFIG> values, as opposed to having empty values as
you get with the default toolchain.
Roundup
As a conclusion to this article is that you should never touch CMAKE_<LANG>_FLAGS_<CONFIG> variables directly.
All the compiler build flags should be set in a toolchain, even if you don’t do cross compiling.
This way you can have a consistent build, with the same compiler flags used for all targets / subprojects!
At the end of October 2018 on the Qt development mailing list it was announced
that CMake was chosen as the build system (generator) for building Qt6. That also meant that The Qt Company will gradually stop
investing in their in house Qbs build system.
I personally think is a good idea to have major C++ projects like Boost (July 2017 switch announcement! ),
LLVM/Clang, and now Qt to use CMake as their build system (generator). We C++ developers should work together in having a common build system.
There was a bit of email traffic on this topic. There was some skepticism of CMake being able to support specialized operating systems
like QNX, so I pointed to an October 2017 blog entry of Doug Schaefer named QNX CMake Toolchain File.
There Doug Schaefer presents us with a minimal CMake Toolchain File.
Since I am lucky(:sweat_smile:) to have a QNX 7.0 license I tried to compile and run the recently released CMake 3.13.0 for the QNX 7.0 x86_64 target!
Notice how I am using CMake 3.13.x’s -S and -B parameters! No more mkdir builddir && cd builddir commands anymore! Yeah! :metal:
The configuration step had some problems because it uses try_run and I was cross-compiling. Running the script a second time worked out fine.
The failed CMake configuration was due to:
CMake Error: TRY_RUN() invoked in cross-compiling mode, please set the following cache variables appropriately:
   KWSYS_LFS_WORKS (advanced)
   KWSYS_LFS_WORKS__TRYRUN_OUTPUT (advanced)

CMake Error: TRY_RUN() invoked in cross-compiling mode, please set the following cache variables appropriately:
   HAVE_POLL_FINE_EXITCODE (advanced)
   HAVE_POLL_FINE_EXITCODE__TRYRUN_OUTPUT (advanced)

 CMake Error at CMakeLists.txt:2 (project):
  The Ninja generator does not support Fortran using Ninja version

    1.8.2

  due to lack of required features.  Kitware has implemented the required
  features but as of this version of CMake they have not been integrated to
  upstream ninja.  Pending integration, Kitware maintains a branch at:

    https://github.com/Kitware/ninja/tree/features-for-fortran#readme

  with the required features.  One may build ninja from that branch to get
  support for Fortran.

CMake Error: CMAKE_Fortran_COMPILER not set, after EnableLanguage
The compilation fails at some point because libuv doesn’t have QNX support. The following patch
gets things working!
The magic part above is the -xplatform qnx-x86-64-qcc. I don’t build icu, fontconfig, because the QNX 7.0 VMware image doesn’t provide them,
and I felt that it defeated my goal to deploy *.so files, hack LD_LIBRARY_PATH, and so on. I just wanted to run ./cmake-gui.
The toolchain does have libicu, which is quite a monster (31.4M!):
The above bug report has some workarounds for this problem, but what if we fixed this? QNX has QCC as a compiler wrapper around GCC, so what if I used GCC directly?
cmake-gui builds and links fine now. In order to run it on the VM, I need to have sftp / ssh access. This is done by running vi /etc/ssh/sshd_config
and change # PermitRootLogin no to PermitRootLogin yes.
After deployment and running /etc/graphics-startup.sh I was able to run /root/installdir/bin/cmake-gui, but then got these nice warnings:
QFontDatabase: Cannot find font directory /opt/qt5/lib/fonts.
Note that Qt no longer ships fonts. Deploy some (from http://dejavu-fonts.org for example) or switch to fontconfig.
This can be fixed in two ways, either set QT_QPA_FONTDIR environment variable to /usr/share/fonts, or create a symlink like:
CMake does have in the CMakeCache.txt an entry called CMAKE_STRIP, which is the case of the original QNX toolchain is set to /usr/bin/strip, because
CMake’s share/cmake-3.13/Modules/CMakeFindBinUtils.cmake has a bug for QNX, it can’t determine the ${_CMAKE_TOOLCHAIN_PREFIX} variable!
This is the reason why the original QNX toolchain had entries to ar and ranlib utilities.
My toolchain simply works, because the GNU GCC detection mechanism of ${_CMAKE_TOOLCHAIN_PREFIX} still applies!
But how can we use CMAKE_STRIP? Well, CMake has an undocumented target named install/strip!
Unfortunately QCC compiler wrapper doesn’t forward this flag to GCC :disappointed:, fortunately my toolchain file makes this possible, since we’re using directly the GCC compiler!
Let’s build a normal Debug build with this script:
$ ccache -s
cache directory                     /home/cadam/.ccache
primary config                      /home/cadam/.ccache/ccache.conf
secondary config      (readonly)    /etc/ccache.conf
stats zero time                     Sun Dec  2 00:05:30 2018
cache hit (direct)                   820
cache hit (preprocessed)               4
cache miss                             0
cache hit rate                    100.00 %
cleanups performed                     0
files in cache                     21883
cache size                         671.5 MB
max cache size                      50.0 GB
I don’t know why I had 4 preprocessed cache hits :smile:
Qt Creator Integration
Qt Creator has had some problems with the QNX / CMake integration. For example these bugs:
The good news is that with the GCC toolchain file these bugs are no longer reproduceable! :metal:
Devil is in the details
If we have a closer look at what CMake compiler detection cmake file (builddir/CMakeFiles/3.13.0/CMakeCXXCompiler.cmake) contains for the
CMAKE_CXX_IMPLICIT_LINK_LIBRARIES, we can see that there is a difference between the original QNX toolchain file and my own. It’s mainly about libgcc.a.
Luckily CMake can be configured to adjust to this, and my toolchain file is a bit more complicated :smile:
If you want an ARM 64 version, just change these two lines:
set(arch ntoaarch64)
set(QNX_PROCESSOR aarch64)
I hope you have enjoyed this C++ compilation ride in the world of the exotic operating system that is QNX!
]]><![CDATA[Speeding up CMake]]>2017-07-09T16:11:16+02:00https://cristianadam.eu/20170709/speeding-up-cmake
At the beginning of this year Bits’n’Bites wrote an article named Faster C++ builds,
in which it’s being described how you can accelerate building LLVM using ninja, using a cache etc.
The following excerpt caught my eye:
For most developers, the time it takes to run CMake is not really an issue since you do it very seldom. However, you should be aware that for CI build slaves in particular, CMake can be a real bottleneck.
For instance, when doing a clean re-build of LLVM with a warm CCache, CMake takes roughly 50% of the total build time!
So I decided to build LLVM 4.0.0 (and clang) on my 2011 Core i7 Lenovo W510 laptop and see if I can reproduce his findings.
Ubuntu 16.04 LTS
First I tested on my KDE Neon Ubuntu 16.04 LTS Linux setup. Ubuntu 16.04 comes with GCC 5.4.0,
ninja 1.5.1. For cmake I used the upcoming version 3.9.0-rc4 from cmake.org.
Setting up LLVM 4.0.0 was done like this:
$ tar xJf llvm-4.0.0.src.tar.xz
$ tar xJf cfe-4.0.0.src.tar.xz
$ mv cfe-4.0.0.src llvm-4.0.0.src/tools/clang
Then I configured CMake twice and built target libclang.
$ mkdir llvm-4.0.0.build
$ cd llvm-4.0.0.build
$ cmake -E time cmake -GNinja ../llvm-4.0.0.src -DCMAKE_BUILD_TYPE=Release -DCMAKE_INSTALL_PREFIX=/home/cadam/llvm -DLLVM_TARGETS_TO_BUILD=X86
$ cmake -E time cmake -GNinja ../llvm-4.0.0.src -DCMAKE_BUILD_TYPE=Release -DCMAKE_INSTALL_PREFIX=/home/cadam/llvm -DLLVM_TARGETS_TO_BUILD=X86
$ cmake -E time cmake --build . --target libclang
The results of cmake -E time commands were:
Elapsed time: 14 s. (time), 0.016894 s. (clock)
Elapsed time: 6 s. (time), 0.00114 s. (clock)
Elapsed time: 2574 s. (time), 0.069965 s. (clock)
CMake time was 0.54% from all build time.
Then I configured ccache:
export PATH=/usr/lib/ccache:$PATH
And then ran the same procedure (cmake twice, libclang target build) three times. First time to cache all
the object files (cold cache) and the second time to use them (warm cache). Third time was using ld.gold as linker.
ccache cold:
Elapsed time: 16 s. (time), 0.015998 s. (clock)
Elapsed time: 6 s. (time), 0.001168 s. (clock)
Elapsed time: 2668 s. (time), 0.07373 s. (clock)
CMake time was 0.59% from all build time.
ccache warm:
Elapsed time: 12 s. (time), 0.015003 s. (clock)
Elapsed time: 6 s. (time), 0.001109 s. (clock)
Elapsed time: 43 s. (time), 0.069825 s. (clock)
CMake time was 21.81% from all build time. Not quite 50%. As we can see that ccache reduced the CMake time by 25%.
Thus having the CMake time talking 23.52% from the all build time.
Ubuntu 16.04 LTS on Windows 10
I tested the same setup on my Windows 10 in the Linux Bash Shell running Ubuntu 16.04 LTS.
Results of a normal build without ccache:
Elapsed time: 84 s. (time), 0.03125 s. (clock)
Elapsed time: 35 s. (time), 0.015625 s. (clock)
Elapsed time: 3328 s. (time), 0.1875 s. (clock)
CMake time was 2.46% from all build time. Compared to running natively cmake was 6x slower.
ccache cold:
Elapsed time: 98 s. (time), 0.140625 s. (clock)
Elapsed time: 37 s. (time), 0 s. (clock)
Elapsed time: 3845 s. (time), 0.25 s. (clock)
CMake time was 2.48% from all build time.
ccache warm:
Elapsed time: 81 s. (time), 0.0625 s. (clock)
Elapsed time: 37 s. (time), 0.015625 s. (clock)
Elapsed time: 223 s. (time), 0.25 s. (clock)
CMake time was 26.64% from all build time.
ccache warm with ld.gold
Elapsed time: 79 s. (time), 0.015625 s. (clock)
Elapsed time: 37 s. (time), 0.015625 s. (clock)
Elapsed time: 213 s. (time), 0.296875 s. (clock)
CMake time was 27.05% from all build time.
The fastest build on Linux Bash Shell was 5.72x slower than running natively.
MinGW-w64 GCC 5.4.0 on Windows 10
My next attempt was to use the same GCC version build natively for Windows. MSys2 comes with GCC, ccache, ninja. Unfortunately llvm + clang was
not compilable. I didn’t try to investigate and fix the problem, instead decided to take the GCC 5.4.0 build from MinGW-w64 repo x86_64-5.4.0-release-posix-seh
My next problem was the fact that I didn’t have ccache anymore. I already knew that ccache is usable on Windows using MinGW and decided to build it.
The following picture describes my feelings after opening the ccache’s source archive:
Instead of giving up I decided write a CMake port for ccache. A few hours later I got it working, code is on github.
I was all set. Results of normal build without cache:
Elapsed time: 44 s. (time), 44.408 s. (clock)
Elapsed time: 22 s. (time), 22.126 s. (clock)
Elapsed time: 2671 s. (time), 2670.62 s. (clock)
CMake time was 1.62% from all build time, and only 3.14x slower than running on Linux.
Setting up ccache was a bit troublesome. On Linux under /usr/lib/ccache the symbolic links for g++ work wonderful. On Windows when I tried using mklink I’ve got ccache complaining about some recursion.
I had to tell CMake to use ccache by using the CMAKE_CXX_COMPILER_LAUNCHER command line parameter.
ccache cold:
Elapsed time: 44 s. (time), 43.901 s. (clock)
Elapsed time: 20 s. (time), 20.747 s. (clock)
Elapsed time: 3326 s. (time), 3325.93 s. (clock)
CMake time was 1.30% from all build time.
ccache warm:
Elapsed time: 43 s. (time), 43.284 s. (clock)
Elapsed time: 20 s. (time), 20.501 s. (clock)
Elapsed time: 99 s. (time), 99.036 s. (clock)
CMake time was 30.28% from all build time. Also all the configure checks were not speed up, I think CMAKE_CXX_COMPILER_LAUNCHER is not taken into consideration in this case.
Elapsed time: 43 s. (time), 43.502 s. (clock)
Elapsed time: 20 s. (time), 20.501 s. (clock)
Elapsed time: 99 s. (time), 99.661 s. (clock)
No difference, which makes me think that LLVM CMake code detects ld.gold if present on Windows and uses it automatically. Found out that CMakeCache.txt had the following
variables: GOLD_EXECUTABLE and LLVM_TOOL_GOLD_BUILD set to ON.
Renamed ld.gold.exe to something else, copied ld.bfd.exe as ld.exe and run the build again.
Elapsed time: 44 s. (time), 44.112 s. (clock)
Elapsed time: 21 s. (time), 20.563 s. (clock)
Elapsed time: 101 s. (time), 101.145 s. (clock)
No idea why there was no more significant difference between ld.bfd.exe and ld.gold.exe.
The Windows native cached build was 2.78x slower than the Linux native build, and 2x faster than the Linux build running under Windows 10’s Linux Bash Shell.
CMake Speedup
Now I guess you are wondering about the promised CMake speedup, right?
You have noticed that the second CMake run is almost two times faster than the first one!
CMake for configure checks actually sets up a small project using the given generator (in my case ninja), it tries to compile the project, and based on the
compilation result determines if some header, function or symbol is present on the system.
These checks are run sequential, not in parallel, and thus they can take some time.
At some point this year I’ve learned that one can override a CMake function / macro and the original function is accessible under the same name prefixed with an underscore.
Daniel Pfeiffer mentions this in his C++Now 2017 Effective CMake talk.
My thought was to override all the checks and cache them for further use.
CMake -C command pre-loads a script to populate the cache.
So I’ve come up with some code (get it from github ) which can be used like this:
When CMake will do an include(CheckIncludeFile) it will get my version of CheckIncludeFile.cmake which will save all findings in cmake_checks_cache.txt file,
or a different file name which you can set via CMAKE_CHECKS_CACHE_FILE.
Implementation has a few hacks due to bugs into CMake *.cmake files. For example CheckSymbolExists.cmake has an implementation macro named _CHECK_SYMBOL_EXISTS!
Also these macros do not have inclusion guards, which means that my override macro will always be redefined by the actual call of include(Check...).
LLVM and clang together have 115 configure checks which are no cached!
The results of the runs are now like this:
Ubuntu 16.04 LTS with warm ccache, ld.gold and cmake-checks-cache:
Elapsed time: 7 s. (time), 0.001996 s. (clock)
Elapsed time: 6 s. (time), 0.001232 s. (clock)
Elapsed time: 40 s. (time), 0.067355 s. (clock)
CMake time is 14.89% from all build time. This is down from 23.52%!
Ubuntu 16.04 LTS on Windows 10 with warm ccache, ld.gold and cmake-checks-cache:
Elapsed time: 44 s. (time), 0.046875 s. (clock)
Elapsed time: 36 s. (time), 0 s. (clock)
Elapsed time: 205 s. (time), 0.1875 s. (clock)
CMake time is 17.67% from all build time. This is down from 27.05%!
MinGW-w64 GCC 5.4.0 on Windows 10 with warm ccache, ld.gold and cmake-checks-cache:
Elapsed time: 25 s. (time), 24.704 s. (clock)
Elapsed time: 21 s. (time), 20.469 s. (clock)
Elapsed time: 99 s. (time), 99.489 s. (clock)
CMake time is 20.16% from all build time. This is down from 30.28%!
You may be wondering why the second CMake run is still faster, that’s because CMake still does the initial compiler checks.
I had a look at what was needed to do to cache those values, and gave up :smile:
Conclusion
If you are using a continuous integration build system (who doesn’t?), and using CMake, you might want to cache all those
checks which do not change very often!
]]><![CDATA[Qt Creator, Ubuntu, and VirtualBox]]>2017-03-21T22:57:08+01:00https://cristianadam.eu/20170321/qt-creator-ubuntu-virtualboxIt is common for IT companies (at least in Germany, automotive field) to use Ubuntu Linux LTS
in a VirtualBox on Windows or Mac hosts. This way the employee can use Microsoft Outlook / Office,
Microsoft Skype, Cisco Spark, or other proprietary collaboration tools, and at the same
time use the supplied virtual machine for development.
By default VirtualBox doesn’t configure any 3D acceleration or multi-core CPU for the guest.
One needs to change these settings in order to have a more responsive desktop environment
and to compile faster :smile: Also important not to forget about the installation of the VirtualBox
Guest Additions.
Running glxinfo on a Ubuntu Linux 16.04 LTS in VirtualBox 5.1.18 gives back this information:
OpenGL vendor string: Humper
OpenGL renderer string: Chromium
OpenGL version string: 2.1 Chromium 1.9
OpenGL shading language version string: 3.30 NVIDIA via Cg compiler
As it turns out this is not enough to run Qt Creator 4.2.1. Qt Creator simply displays
a black welcome screen on Ubuntu Linux 16.04 LTS, or simply crash on Ubuntu 14.04 / 12.04 LTS:
If Qt Creator is run from command line, it will give out these messages (Ubuntu 16.04 LTS):
If you do a web search after “Qt Creator VirtualBox crash” you will find out how to fix
this problem – either disabling the welcome plug-in, or disable the 3D acceleration of
your VirtualBox.
Disabling the 3D acceleration means that the system will use a software OpenGL driver.
But then again why not simply use a software OpenGL driver just for Qt Creator and
not for the whole system?
Qt Creator ships on Windows with a software OpenGL driver you can find it under
Qt Creator’s bin directory and it’s named opengl32sw.dll. If you rename the file
to opengl32.dll you will force Qt Creator to use the software OpenGL driver.
What about Linux? Unfortunately Qt Creator doesn’t ship the equivalent OpenGL driver,
so you will have to build it yourself, or download the precompiled binaries that
I will provide at the end of the article.
If you look at Mesa 3D’s llvmpipe page you will
see how easy it is to build the software driver:
Install the prerequisites sudo apt install g++ scons llvm-dev
Get the source code wget https://mesa.freedesktop.org/archive/mesa-17.0.2.tar.xz
And compile with scons build=release libgl-xlib
This is true if you have all the prerequisites! If you don’t have them, then it’s a process
of compile, break on error, install missing package, and then try again.
After a few attempts I’ve managed to have this build script:
Simply unpack with tar xJf ubuntu...tar.gz -C ~/qtcreator-4.2.1/lib/qtcreator/ and
Qt Creator should pick the software OpenGL driver on the next start.
Ubuntu 12.04
Ubuntu 12.04 is a bit dated and it requires a few workarounds in order to run Qt Creator 4.2.1
If you get the following error:
./qtcreator: symbol lookup error: /home/cristian/qtcreator-4.2.1/lib/Qt/plugins/platformthemes/libqgtk3.so: undefined symbol: g_type_ensure
Simply delete the libqgtk3.so file. Qt Creator will then start.
The next runtime error will be, displayed as the reason for not being able to load many plugins:
"/usr/lib/x86_64-linux-gnu/libstdc++.so.6: version `GLIBCXX_3.4.18' not found"
Which gets fixed by installing the following ppa and a reboot for good measure:
You can use the Software OpenGL driver for other x86_64 programs, not only Qt Creator :smile:
]]><![CDATA[NullPointerException in C++]]>2016-09-14T20:27:54+02:00https://cristianadam.eu/20160914/nullpointerexception-in-c-plus-plusFor those familiar with languages like Java, and C#, something like NullPointerException
shouldn’t come as a surprise. But what about C++? C++ also has exceptions, right?
In C++ reading or writing at address zero is an access violation. By default an access
violation will result in the immediate termination of the program. What else results
in immediate termination of the program? Division by zero! There is no ArithmeticException, only
a swift termination!
The OS’ SDK usually provides a way to catch such access violations and recover from them.
This way of catching access violations involves a C callback method and a bit of setup.
Wouldn’t be nice if the setup would be one line of code and the C callback function
would throw C++ exceptions behind the scenes?
But it does work like this. At least on Windows and Linux (I don’t have access to a macOS machine),
and only with a few select compilers.
Before going further into details I would like to present my test case: define functions which do:
Division by zero
Reading from nullptr
Writing at nullptr
Write to an empy vector with the subscript operator []
Read from an uninitialized shared_ptr
Execute them ten times to make sure that this is not only one time “wonder”. Every try block will
have an instance of a RAII Message object to make sure that stack unwinding is taking place, and
that we won’t have any resource leaks.
0------------------------------------
Message: division by zero
~Message: division by zero
OS exception: division by zero!
Message: reading empty shared_ptr
~Message: reading empty shared_ptr
OS exception: null pointer!
Message: out of bounds vector
~Message: out of bounds vector
OS exception: null pointer!
Message: read from nullptr
~Message: read from nullptr
OS exception: null pointer!
Message: write to nullptr
~Message: write to nullptr
OS exception: null pointer!
------------------------------------0
For brevity I displayed only the first block.
How should except::register_for_os_exceptions() look like? Can it be done in a cross-platform way,
or only with platform specific code?
std::signal
std::signal is part of the C library and subsequently also from C++ library. The cppreference.com
page has some information about this, but the example they provide doesn’t actually help with my
task at hand.
std::signal should not be used in multi threading programs and it doesn’t provide additional
information about the error. For example for the SIGSEGV signal we cannot get the address at which
the access violation has occurred.
From the tests I have made I can say that the signal handling and recovery is not cross platform.
It is at most one shot and only Visual C++ generates code that recovers.
Implementation of except::register_for_os_exceptions() looks like this:
constchar* signalDescription(int sgn)
{
switch(sgn)
{
case SIGABRT: return"SIGABRT";
case SIGFPE: return"SIGFPE";
case SIGILL: return"SIGILL";
case SIGINT: return"SIGINT";
case SIGSEGV: return"SIGSEGV";
case SIGTERM: return"SIGTERM";
default: return"UNKNOWN";
}
}
void signalHandler(int sgn)
{
std::ostringstream os;
os << "Signal caught: " << signalDescription(sgn) << "(" << sgn << ")";
signal(sgn, signalHandler);
throw std::runtime_error(os.str().c_str());
}
void register_for_os_exceptions()
{
signal(SIGABRT, signalHandler);
signal(SIGFPE, signalHandler);
signal(SIGILL, signalHandler);
signal(SIGINT, signalHandler);
signal(SIGSEGV, signalHandler);
signal(SIGTERM, signalHandler);
}
In the next part I would name std::signal as POSIX_SIGNAL.
Microsoft Structured Exception Handling is the native exception handling mechanism for Windows and a forerunner technology to Vectored Exception Handling (VEH). It features the finally mechanism not present in standard С++ exceptions (but present in most imperative languages introduced later). SEH is set up and handled separately for each thread of execution.
The Microsoft implementation of SEH is based on a patent licensed from Borland, U.S. Patent 5,628,016. Open-source operating systems have resisted adopting a SEH-based mechanism due to this patent.
Microsoft supports SEH as a programming technique at the compiler level only. MS Visual C++ compiler features three non-standard keywords: __try, __except and __finally — for this purpose.
Those __try, __except, __finally keywords look very scary. Luckily we don’t need to worry
about them. Microsoft provided the function set_se_translator()
which handles the C structured exceptions as C++ typed exceptions.
Implementation of except::register_for_os_exceptions() looks like this:
constchar* seDescription(constunsignedint& code)
{
switch (code)
{
case EXCEPTION_ACCESS_VIOLATION: return"EXCEPTION_ACCESS_VIOLATION";
case EXCEPTION_ARRAY_BOUNDS_EXCEEDED: return"EXCEPTION_ARRAY_BOUNDS_EXCEEDED";
case EXCEPTION_BREAKPOINT: return"EXCEPTION_BREAKPOINT";
case EXCEPTION_DATATYPE_MISALIGNMENT: return"EXCEPTION_DATATYPE_MISALIGNMENT";
case EXCEPTION_FLT_DENORMAL_OPERAND: return"EXCEPTION_FLT_DENORMAL_OPERAND";
case EXCEPTION_FLT_DIVIDE_BY_ZERO: return"EXCEPTION_FLT_DIVIDE_BY_ZERO";
case EXCEPTION_FLT_INEXACT_RESULT: return"EXCEPTION_FLT_INEXACT_RESULT";
case EXCEPTION_FLT_INVALID_OPERATION: return"EXCEPTION_FLT_INVALID_OPERATION";
case EXCEPTION_FLT_OVERFLOW: return"EXCEPTION_FLT_OVERFLOW";
case EXCEPTION_FLT_STACK_CHECK: return"EXCEPTION_FLT_STACK_CHECK";
case EXCEPTION_FLT_UNDERFLOW: return"EXCEPTION_FLT_UNDERFLOW";
case EXCEPTION_ILLEGAL_INSTRUCTION: return"EXCEPTION_ILLEGAL_INSTRUCTION";
case EXCEPTION_IN_PAGE_ERROR: return"EXCEPTION_IN_PAGE_ERROR";
case EXCEPTION_INT_DIVIDE_BY_ZERO: return"EXCEPTION_INT_DIVIDE_BY_ZERO";
case EXCEPTION_INT_OVERFLOW: return"EXCEPTION_INT_OVERFLOW";
case EXCEPTION_INVALID_DISPOSITION: return"EXCEPTION_INVALID_DISPOSITION";
case EXCEPTION_NONCONTINUABLE_EXCEPTION: return"EXCEPTION_NONCONTINUABLE_EXCEPTION";
case EXCEPTION_PRIV_INSTRUCTION: return"EXCEPTION_PRIV_INSTRUCTION";
case EXCEPTION_SINGLE_STEP: return"EXCEPTION_SINGLE_STEP";
case EXCEPTION_STACK_OVERFLOW: return"EXCEPTION_STACK_OVERFLOW";
default: return"UNKNOWN EXCEPTION";
}
}
void seTranslator(unsignedint code, struct _EXCEPTION_POINTERS* ep)
{
if (code == EXCEPTION_ACCESS_VIOLATION || code == EXCEPTION_IN_PAGE_ERROR)
{
if (ep->ExceptionRecord->ExceptionInformation[1] == 0)
{
throw null_pointer_exception();
}
}
elseif (code == EXCEPTION_FLT_DIVIDE_BY_ZERO ||
code == EXCEPTION_INT_DIVIDE_BY_ZERO)
{
throw division_by_zero_exception();
}
std::ostringstream os;
os << "Structured exception caught: " << seDescription(code);
throw std::runtime_error(os.str().c_str());
}
void register_for_os_exceptions()
{
_set_se_translator(seTranslator);
}
As you can see now we can have null_pointer_exception and division_by_zero_exception because
SEH provides enough information.
The above code only works when the compiler parameter /EHa
is set.
MSDN says about /EHa the following:
The exception-handling model that catches both asynchronous (structured) and synchronous (C++) exceptions.
The /EHa compiler option is used to support asynchronous structured exception handling (SEH) with the native C++ catch(...) clause.
If you use /EHa, the image may be larger and might perform less well because the compiler does not optimize a try block as aggressively. It also leaves in exception filters that automatically call the destructors of all local objects even if the compiler does not see any code that can throw a C++ exception. This enables safe stack unwinding for asynchronous exceptions as well as for C++ exceptions.
Visual C++ obviously has support for SEH exceptions. But what about the clang-cl drop in replacement?
Clang 4.0 documentation states the following about SEH:
Asynchronous Exceptions (SEH): Partial. Structured exceptions (__try / __except / __finally) mostly work on x86 and x64. LLVM does not model asynchronous exceptions, so it is currently impossible to catch an asynchronous exception generated in the same frame as the catching __try.
What about GCC on Windows (MinGW)? GCC has a Wiki page
which states:
Unfortunately, GCC does not support SEH yet. Casper Hornstrup had created an initial implementation, but it was never merged into mainline GCC. Some people have expressed concerns over a Borland patent on SEH, but Borland seems to dismiss these concerns as balderdash.
In practice MinGW GCC 6.1.0 has the <eh.h> header, but the linker gives an error:
undefined reference to '__imp__Z18_set_se_translatorPFvjP19_EXCEPTION_POINTERSE'.
But what about Clang with Microsoft CodeGen which is available since Visual C++ 2015 Update 1?
Compilation gives an error: error : Element <ExceptionHandling> has an invalid value of "Async".
POSIX’s sigaction
POSIX had an update to std::signal which works in multi-threaded environment and it provides
information about error cases, this update is sigaction.
Implementation of except::register_for_os_exceptions() looks like this:
The above code works with the compiler flag -fnon-call-exceptions.
Testing
I have put the code on github and I have tested on two
machines: Lenovo W510 i7 laptop and a Raspberry Pi 2. For both machines I tested Windows 10, and Linux
operating systems.
For Lenovo W510 i7:
Windows 10 Visual C++ 2015 Update 3 SEH and POSIX_SIGNAL
Windows 10 Visual C++ Clang 3.8 with Microsoft CodeGen SEH
Windows 10 MSYS2 GCC 6.1.0, Clang 3.8.0 POSIX_SIGNAL
Windows 10 Cygwin GCC 5.3.0, Clang 3.7.1 POSIX_SIGNAL and POSIX_SIGACTION
Windows 10 Clang 3.9.0 with clang-cl SEH and POSIX_SIGNAL
Windows 10 Ubuntu Bash (14.04) for Windows GCC 4.8.4 and Clang 3.5.0 POSIX_SIGNAL and POSIX_SIGACTION
Windows 10 Ubuntu 14.04 in VirtualBox GCC 4.8.4 and Clang 3.5.0 POSIX_SIGNAL and POSIX_SIGACTION
Kubuntu 16.04 GCC 5.4.0 and Clang 3.8.0 POSIX_SIGNAL and POSIX_SIGACTION
For Raspberry Pi 2:
Raspbian Jessie GCC 4.9.2 and Clang 3.5.0 POSIX_SIGNAL and POSIX_SIGACTION
Windows 10 IoT Visual C++ 2015 Update 3 SEH and POSIX_SIGNAL
In the reports below I have combined “readNullPointer” with “nullSharePointer” and “writeNullPointer” with “outOfBoundsVector”.
Windows 10
Compiler
Read nullptr
Write nullptr
/ Zero
Visual C++ 2015 Update 3 SEH
YES
YES
YES
Visual C++ 2015 Update 3 POSIX_SIGNAL
YES
YES
x
Visual C++ Clang 3.8 with Microsoft CodeGen SEH
x
x
x
MSYS2 GCC 6.1.0, POSIX_SIGNAL
x
x
x
MSYS2 Clang 3.8.0 POSIX_SIGNAL
x
x
x
Cygwin GCC 5.3.0, POSIX_SIGNAL
x
x
x
Cygwin GCC 5.3.0, POSIX_SIGACTION
x
x
x
Cygwin Clang 3.7.1 POSIX_SIGNAL
x
x
x
Cygwin Clang 3.7.1 POSIX_SIGACTION
x
x
x
Clang 3.9.0 with clang-cl SEH
x
x
x
Clang 3.9.0 with clang-cl POSIX_SIGNAL
x
x
x
Bash for Windows 10 GCC 4.8.4 POSIX_SIGNAL
x
x
x
Bash for Windows 10 GCC 4.8.4 POSIX_SIGACTION
YES
YES
x
Bash for Windows 10 Clang 3.5.0 POSIX_SIGNAL
x
x
x
Bash for Windows 10 Clang 3.5.0 POSIX_SIGACTION
x
x
x
Ubuntu 14.04 in VirtualBox GCC 4.8.4 POSIX_SIGNAL
x
x
x
Ubuntu 14.04 in VirtualBox GCC 4.8.4 POSIX_SIGACTION
YES
YES
YES
Ubuntu 14.04 in VirtualBox Clang 3.5.0 POSIX_SIGNAL
x
x
x
Ubuntu 14.04 in VirtualBox Clang 3.5.0 POSIX_SIGACTION
x
x
x
Visual C++ 2015 generates for POSIX_SIGNAL’s division by zero something else as it does for SEH. I might have found a compiler bug.
For Bash for Windows 10 and Ubuntu 14.04 in Virtual Box we have the same binary generated by GCC for POSIX SIGACTION.
But on Bash for Windows 10 division by zero behaves like the binary which Visual C++ 2015 generates for POSIX_SIGNAL.
It could be just a coincidence, or it may be the fact that Microsoft has reused their POSIX_SIGNAL implementation :smile:
Clang has a weird behavior for readNullPointer, it actually executes std::cout << *p << std::endl code
(notice that 0, which on different platforms has different values):
0------------------------------------
Message: read from nullptr
0
~Message: read from nullptr
------------------------------------0
Kubuntu 16.04
Compiler
Read nullptr
Write nullptr
/ Zero
GCC 5.4.0 POSIX_SIGNAL
x
x
x
GCC 5.4.0 POSIX_SIGACTION
YES
YES
YES
Clang 3.8.0 POSIX_SIGNAL
x
x
x
Clang 3.8.0 POSIX_SIGACTION
x
x
x
By now I know that POSIX_SIGNAL is platform dependent, but I have no idea how to implement it to work with GCC on Linux.
Raspberry Pi Windows 10 IoT
Compiler
Read nullptr
Write nullptr
/ Zero
Visual C++ 2015 Update 3 SEH
YES
YES
x
Visual C++ 2015 Update 3 POSIX_SIGNAL
YES
YES
x
The difference between Visual C++ x64 and ARM is that for SEH division by zero generates on ARM:
0------------------------------------
Message: division by zero
OS exception: division by zero!
------------------------------------0
The destructor is not being called! I might have found another compiler bug.
Raspberry Pi Rasbpian
Compiler
Read nullptr
Write nullptr
/ Zero
GCC 4.9.2 POSIX_SIGNAL
x
x
x
GCC 4.9.2 POSIX_SIGACTION
x
x
x
Clang 3.5.0 POSIX_SIGNAL
x
x
x
Clang 3.5.0 POSIX_SIGACTION
x
x
x
GCC on ARM doesn’t work with POSIX_SIGACTION as it does on Desktop. Could be another compiler bug.
Microsoft can generate for ARM code which works almost as on x64, I don’t see why GCC shouldn’t do the same.
You can find all the output of all programs on github.
Performance
We all know that exceptions are not loved by C++ developers. But nowadays with the advent of
Zero Cost Exceptions there
should not be a speed penalty for using them (in error cases only).
If statements have a cost,
considerably smaller than the cost of throwing an exception. But if you have a lot of them at some
point the cost of all those ifs will be bigger than the cost of occasionally throwing an exception.
You can try out this benchmark (forked from Bogdan Vatră’s repository)
to find out at which point exceptions are faster than return codes :smile:
The benchmark doesn’t use except, but the performance with a division_by_zero_exception should be in the same ballpark.
#include<chrono>#include<exception>#include<iostream>usingnamespace std;
static uint32_t checkPoint = 100;
staticconst uint32_t testCount = 1000000000l;
uint64_t toInt(uint64_t value, bool& valid) noexcept
{
valid = true;
if (value % checkPoint == 0)
valid = false;
if (!valid)
return value;
return ++value;
}
uint64_t toInt(uint64_t value)
{
if (value % checkPoint == 0)
throw std::invalid_argument("bla bla");
return ++value;
}
int main()
{
cout << "Benchmarking exceptions, doing " << testCount << " function calls" << endl;
while (checkPoint < testCount) {
cout << "Throw an error every " << checkPoint << " calls" << endl;
auto startError = chrono::high_resolution_clock::now();
for (uint64_t test = 0; test < testCount;) {
bool valid;
test = toInt(test, valid);
if (!valid)
++test;
}
auto stopError = chrono::high_resolution_clock::now();
auto startThrow = chrono::high_resolution_clock::now();
for (uint64_t test = 0; test < testCount;) {
try {
test = toInt(test);
} catch (...) {
++test;
}
}
auto stopThrow = chrono::high_resolution_clock::now();
auto errorTicks = (stopError - startError).count();
auto throwTicks = (stopThrow - startThrow).count();
cout << "Error ticks " << errorTicks << endl << "Throw ticks " << throwTicks << endl;
if (errorTicks > throwTicks) {
auto ratio = double(errorTicks)/double(throwTicks) ;
cout << "Throw is x" << ratio << " times (" << (ratio -1) * 100 << "%) faster" << endl;
} else {
auto ratio = double(throwTicks)/double(errorTicks);
cout << "Error is x" << ratio << " times (" << (ratio -1) * 100 << "%) faster" << endl;
}
cout << "-------------------------------" << endl;
checkPoint *= 10;
}
return0;
}
Binary compiled with Visual C++ 2015 Update 3 x64 performed on my Lenovo W510 i7 like this:
Benchmarking exceptions, doing 1000000000 function calls
Throw an error every 100 calls
Error ticks 12923327818
Throw ticks 32912109611
Error is x2.54672 times (154.672%) faster
-------------------------------
Throw an error every 1000 calls
Error ticks 12709068503
Throw ticks 9856135615
Throw is x1.28946 times (28.9458%) faster
-------------------------------
Throw an error every 10000 calls
Error ticks 12406945748
Throw ticks 8314639531
Throw is x1.49218 times (49.2181%) faster
-------------------------------
Throw an error every 100000 calls
Error ticks 12133724149
Throw ticks 7524532681
Throw is x1.61256 times (61.2555%) faster
-------------------------------
Throw an error every 1000000 calls
Error ticks 11891683998
Throw ticks 7277094208
Throw is x1.63413 times (63.4125%) faster
-------------------------------
Throw an error every 10000000 calls
Error ticks 11875875947
Throw ticks 7263120632
Throw is x1.63509 times (63.5093%) faster
-------------------------------
Throw an error every 100000000 calls
Error ticks 11922168230
Throw ticks 7265200344
Throw is x1.641 times (64.0996%) faster
-------------------------------
Conclusion
As you can see it is possible to handle OS exceptions is a cross platform way with the help of a
very small library. It works on Windows with Visual C++ (x64, ARM) and on Linux with GCC (x64).
]]><![CDATA[C++ I/O Benchmark]]>2016-04-10T23:31:52+02:00https://cristianadam.eu/20160410/c-plus-plus-i-slash-o-benchmarkIn this post I will talk about copying files. I will read one file in chunks
of 1MB and write it to another file.
C++ provides three cross platform APIs for I/O (input/output):
C FILE API (fopen, fread, fwrite)
C++ API (std::ifstream, std::ofstream)
POSIX API (open, read, write)
The POSIX API requires a bit of #ifdef-ing to get it working cross platform,
but it’s not that scary.
Reading and writing 1 MB of data should work more or less as fast for
all APIs, right?
I have run the benchmark on my SSD powered Lenovo Core i7 laptop running
Windows 10 and Kubuntu 15.10, and on a SSD powered Raspberry PI2 running
the latest Raspbian.
I have used Boost 1.60 zip package file (125 MB) as the file to copy around.
My test script looks like this:
@echo off
test_io.exe c boost_1_60_0.zip 10 > nul
test_io.exe c boost_1_60_0.zip 100
test_io.exe posix boost_1_60_0.zip 10 > nul
test_io.exe posix boost_1_60_0.zip 100
test_io.exe c++ boost_1_60_0.zip 10 > nul
test_io.exe c++ boost_1_60_0.zip 100
For the Linux variant just replace @echo off with /bin/bash, > nul with /dev/null and
the line endings :smile:
Windows 10
I have tested Visual C++ 2013 32 and 64 bit, Clang 3.7.1 with Visual C++ 2013 32 and 64 bit,
MinGW 4.9.2 32 bit from Qt 5.6 distribution, MinGW 5.3.0 64 bit from Nuwen, Cygwin GCC 5.3.0 64 bit,
and Cygwin Clang 3.7.1 64 bit.
Visual C++ and Clang compilation line was cl /O2 /EHsc test_io.cpp, for MinGW I had
g++ -O2 test_io.cpp -o test_io -std=c++11, and for Cygwin Clang
clang -O2 test_io.cpp -o test_io -std=c++11 -lstdc++.
I have also disabled the real time protection from Windows Defender.
The results are below:
Compiler
C FILE
POSIX
C++
Visual C++ 2013 32
111.8 ms
111.8 ms
320.91 ms
Visual C++ 2013 64
111.44 ms
109.74 ms
309.27 ms
Visual C++ 2015 32
107.22 ms
107.47 ms
315.7 ms
Visual C++ 2015 64
109.57 ms
106.87 ms
305.6 ms
Clang 3.7.1 32
101.43 ms
101.38 ms
446.26 ms
Clang 3.7.1 64
101.71 ms
99.5 ms
460.8 ms
MinGW 4.9.2 32
104.7 ms
108.78 ms
110.67 ms
MinGW 5.3.0 Nuwen
110.34 ms
107.48 ms
110.83 ms
Cygwin GCC 5.3.0 64
124.91 ms
108.36 ms
181.32 ms
Cygwin Clang 3.7.1 64
121.74 ms
105.91 ms
181.65 ms
Surprisingly only MinGW GCC provides the same performance for all three APIs.
Visual C++ and Clang using Visual C++’s CRT library has a 2.87x, respectively a 4.39x
slower C++ API than C or POSIX API !!!
On Cygwin the C and C++ APIs are slower than the POSIX API.
It is very interesting to know why GCC’s libstdc++ behaves on Cygwin slower than on MinGW!
Kubuntu 15.10
I have booted my Linux distribution and ran the same test there, results below:
Compiler
C FILE
POSIX
C++
GCC 5.2.1 64
109.17 ms
105.85 ms
107.23ms
Clang 3.6.2 64
110.26 ms
105.72 ms
107.71 ms
Nothing to see here but consistency! :smile:
Raspberry PI2
Thanks to this test I have finally managed set up my Raspberry PI2 :smile:
I had a bit of fun making the USB SSD hard drive to work with Raspberry PI2, increasing
partition size, and so on.
The results of the test a below:
Compiler
C FILE
POSIX
C++
GCC 4.9.2
1277.07 ms
1239.34 ms
1238.49 ms
Clang 3.5.0
1282.46 ms
1262.77 ms
1284.25 ms
The C++ API for GCC was the fastest! :sunglasses:
Interesting to see that Raspberry PI2 was ~12 times slower than my Core i7 laptop.
Conclusion
The POSIX API provides the best results on all platforms tested!
]]><![CDATA[Introducing C++ experimental io2d]]>2016-02-28T18:53:09+01:00https://cristianadam.eu/20160228/introducing-c-plus-plus-experimental-io2dIn this post I will be talking about P0267R0: A Proposal to Add 2D Graphics Rendering and Display to C++.
This proposal will be discussed next week at the next ISO C++ Standardization meeting in Jacksonville.
P0267R0 comes out of C++’s SG13 HMI: Development of new proposals in selected human-machine interaction such as low-level graphics/pointing I/O primitives.
SG13 was created by Herb Sutter after the One C++ keynote talk he gave at GoingNative 2013.
Personal history
I started programming twenty years ago in high school. Back then I didn’t even have my own computer :smile:
Below you have the cover of the book that was used to teach us Turbo Pascal:
Please notice the graphics on the book’s cover. That drawing was presented as an example in the book by the means
of Borland Graphics Interface (BGI).
A couple of years ago I had to port a car navigation engine to an Unix-like operating system. The target computer
had support for OpenGL ES, the navigation engine could display images on the map, but none of them came with
a 2D graphics engine.
I ended up porting Cairo Graphics just to render some text into PNG images, and to rotate
a car image on the map.
N3888
SG13 also used Cairo Graphics as base for their first proposal - N3888.
In the meantime the proposal matured as P0267R0, and the API has changed a bit.
The implementation has Visual C++ project files with pre-compiled binaries for Windows, and autotools support for Linux. This is due to the fact that
Cairo Graphics comes from Linux world and they provide a makefile to compile on Windows. Michael McLaughlin has documented
his work to build Cairo Graphics for Windows. Shiver.
Luckily there is a tool for cross platform C++ project building – CMake! This week I added CMake support for the reference implementation,
see my fork at github: https://github.com/cristianadam/io2d.
Hello World
As it turns out the application code Michael B. McLaughlin used to test the implementation doesn’t compile out of the box. So I decided
to write a simple “Hello World” application.
I had a look at the minimal C program using Cairo and decided to do the
same with io2d. In the example the “Hello World” string is being rendered with a blue brush and saved as a PNG
graphics file.
io2d doesn’t have support for PNG graphics files, or other graphics file format for that matter. So I had to come up with something
easy. I choose the TGA file format, because one just has to write a 18 bytes header and then dump the raw image bytes.
And no, BMP file format is not easy :smile:
After running hello.exe I ended up with hello.tga which looks like
this when opened with The GIMP:
It worked! :tada:
C++17?
From Michael Wong’s blog post: C++17 content (a prediction)
we can see that Graphics TS is not meant to be included in C++17 :disappointed:
I really do hope that SG13’s Graphics TS will be part of C++ sooner than later, because graphics programming is so much fun!
]]><![CDATA[Speeding up libclang on Windows]]>2016-01-04T19:03:04+01:00https://cristianadam.eu/20160104/speeding-up-libclang-on-windows
In this article I will tackle libclang’s speed on Windows, in particular Qt Creator’s clang code model.
Qt Creator 3.6.0 fixed the following bug: QTCREATORBUG-15365: Clang Model: code completion speed regression.
The bug report contains information on how to enable Qt Creator’s clang code model statistics. This is done
by setting this environment variable: QT_LOGGING_RULES=qtc.clangbackend.timers=true.
On Windows Qt Creator will output this information in Windows debugger output. I use DebugView
to view this information.
libclang is used by Qt Creator to provide code completion support. The clang code model is still experimental and not 100% feature equivalent with
the Qt Creator built-in code model.
By using the clang code model it means that Qt Creator uses a real C++ compiler to parse the source code you are editing. It also means
that if you are having a big source file, with lots of includes, it will take some time to do so.
Qt Creator will cache this information in a form of a pch file under %temp%/qtc-clang-[some letters]/preamble-[some numbers].pch file. The complete
compilation is done only once. The subsequent code completion commands are fast.
I have picked Lyx – The Document Processor as a test project for Qt Creator. Lyx uses Boost and Qt5 and on my Intel(R) Core (TM) i7 CPU
M 620 @ 2.67 GHz Windows 10 powered laptop it takes, for Text3.cpp, approximately 10 seconds to “compile”.
Even though my laptop has multiple cores, libclang will use only one core to compile Text3.cpp. What can we do about it? It would be nice if
libclang could use the GPU :smile:
Qt Creator 3.6.0 ships with libclang 3.6.2, and for Windows it ships a Visual C++ 2013 32 bit build, unlike Linux where 64 bit is the norm.
I will take clang 3.6.2 and compile it Visual C++ 2013, Visual C++ 2015, Clang 3.7.0 and Mingw-w64 GCC 5.3.0. I have managed to get libclang to
compile Text3.cpp in approximatively 6 seconds. Which C++ compiler was able to this?
The test was to open Text3.cpp, navigate to the end and wait for qtc.clangbackend.timers: ClangIpcServer::registerTranslationUnitsForEditor to show up in DebugView.
Then close the document and open it again. I have done this 10 times, to have a better mean (average) value.
To find out how many header Text3.cpp was including I went to Qt Creator’s menu: “Tools -> C++ -> Inspect C++ Code Model… (Ctrl+Shift+F12)”
and found out that for Visual C++ it was including 776 documents, and for MinGW 4.9.2 828 documents!
I will compile libclang.dll with various C++ compilers and see how it works with both Visual C++ 2013 kit and MinGW 4.9.2 kit in Qt Creator.
Visual C++ 2013 32 bit
Qt Creator shipps with libclang.dll compiled with Visual C++ 2013 32 bit. The mean value
for registerTranslationUnitsForEditor was 9533.13. Let’s say it’s almost 10 seconds :smile:
By switching to MinGW 4.9.2 the mean value for registerTranslationUnitsForEditor was 8248.3 ms. By simply switching to MinGW I gained a 13.4% speed
increase.
We got this speed up because the MinGW include headers are IMO easier to parse / simpler than the Visual C++ ones.
When going to the “Inspect C++ Code Model…” dialog Qt Creator will generate a %temp%/qtc-codemodelinspection_[some numbers].txt file. For Visual C++ 2013
this file was 13.2 MB in size, while for MinGW 4.9.2 it was 10.2 MB in size.
The preamble_[some numbers].pch file (generated by libclang) was bigger for MinGW 4.9.2 – 26.5 MB in size, while for Visual C++ 2013 it was 24.7 MB in size.
Compiling Qt Creator
It is known that 64 bit performs faster than 32 bit, right? Therefore let’s compile libclang and Qt Creator for 64 bit.
Download qt-creator-opensource-src-3.6.0.zip and unpack it somewhere. Then run the following
commands from the Visual C++ 2013 64bit Tools Command Prompt:
$ mkdir qt-creator-build
$ cd qt-creator-build
$ set LLVM_INSTALL_DIR=c:\llvm
$ set PATH=C:\Qt\Qt5.5.1-x64\5.5\msvc2013_64\bin;%PATH%
$ qmake ..\qt-creator-opensource-src-3.6.0\qtcreator.pro CONFIG+=release -r -spec win32-msvc2013
$ set PATH=c:\Qt\Qt5.5.1-x64\Tools\QtCreator\bin\;%PATH%
$ cmake -E time jom
Note the set LLVM_INSTALL_DIR=c:\llvm command, which means that you have to compile and install clang to c:\llvm fist. Before compiling
Qt Creator please compile clang (the next paragraph) and instead of cmake -E time ninja libclang do a full cmake -E time ninja build.
A full clang build with Visual C++ 2013 64 bit took on my machine 39m:43s. Qt Creator 64 bit was build in 22m:51s.
To run my Qt Creator build, I have created a batch file (run.cmd) containing:
@echo off
set PATH=C:\Qt\Qt5.5.1-x64\5.5\msvc2013_64\bin;%PATH%
set PATH=c:\Qt\Qt5.5.1-x64\Tools\QtCreator\bin\;%PATH%
set QT_LOGGING_RULES=qtc.clangbackend.timers=true
qtcreator
$ tar xJf llvm-3.6.2.src.tar.xz
$ tar xJf cfe-3.6.2.src.tar.xz
$ mv cfe-3.6.2.src llvm-3.6.2.src/tools/clang
One could do without Cygwin by using e.g. 7-zip, but I find Cywgin more convenient.
To configure and compile clang one only needs to issue the following commands (under Visual C++ Tools Command Prompt)
$ mkdir llvm-3.6.2-build
$ cd llvm-3.6.2-build
$ cmake -G "Ninja" ..\llvm-3.6.2.src\ -DCMAKE_BUILD_TYPE=Release -DCMAKE_INSTALL_PREFIX=c:\llvm -DLLVM_TARGETS_TO_BUILD=X86
$ cmake -E time ninja libclang
cmake -E time is very practical on Windows to time various operations since the Windows command prompt lacks the equivalent of time from Unix/Linux.
libclang.dll will be placed under llvm-3.6.2-build/bin directory.
Since libclang.dll provides a C API interface we can simply swap it without having to recompile Qt Creator.
Visual C++ 2013 64 bit
I have opened up a Visual C++ 2013 64 bit Tools Command Prompt and issued the two cmake commands in a specific build directory. The build took 24m:26s.
The resulted libclang was 10.1 MB.
The mean value for registerTranslationUnitsForEditor for the Visual C++ kit was 9371.5 ms, and for the MinGW kit was 8434.6 ms.
Compared with Visual C++ 2013 32 bit the value for Visual C++ was better while the value for MinGW was worse.
Visual C++ 2015 32 bit
Visual C++ 2015 has implemented some C++17 features and the source code for clang 3.6.2 needs to be patched
(info taken from r237863):
After having the above patch in, I was able to compile libclang with Visual C++ 2015 32 bit libclang.dll in
16m:27s. Quite snappy. libclang.dll was 7.60 MB in size. Quite small :smile:
The mean value for registerTranslationUnitsForEditor for the Visual C++ kit was 9541.9 ms, and for the MinGW kit was 8238.3 ms.
The values are almost identical to the Visual C++ 2013 32 bit ones.
Visual C++ 2015 64 bit
Next I’ve compiled the Visual C++ 2015 64 bit libclang.dll version. It took 19m:10s. That is almost 3 minutes slower than the 32 bit.
The binary size of libclang.dll was 10.2 MB.
The mean value for registerTranslationUnitsForEditor for the Visual C++ kit was 9213.1 ms, and for the MinGW kit was 8266.4 ms.
Visual C++ 2015 64 bit produced faster results than Visual C++ 2013 64 bit! Yey progress!
Clang 3.7.0 32 bit
The next step was to compile libclang with Clang itself. I took Clang for Windows (32-bit)
and installed under C:\Program Files (x86)\LLVM.
Clang on Windows comes with a Visual C++ cl.exe compatible driver, some headers and some support for MS Build. It doesn’t come with a
C++ standard library, it completely relies on Visual C++ to provide those.
Since I am using ninja to build liblang I had to issue the following commands from a Visual C++ 2013 32 bit Tools Command Prompt:
$ set PATH=C:\Program Files (x86)\LLVM\msbuild-bin\;%PATH%
$ set INCLUDE=C:\Program Files (x86)\LLVM\lib\clang\3.7.0\include\;%INCLUDE%
But before issuing the usual CMake commands, libclang CMake machinery needs to be patched:
diff -Naur llvm-3.6.2.src/cmake/modules/HandleLLVMOptions.cmake llvm-3.6.2.src-clang/cmake/modules/HandleLLVMOptions.cmake--- llvm-3.6.2.src/cmake/modules/HandleLLVMOptions.cmake 2014-12-02 19:59:08.000000000 +0100+++ llvm-3.6.2.src-clang/cmake/modules/HandleLLVMOptions.cmake 2016-01-03 00:40:20.014951500 +0100@@ -29,14 +29,14 @@
set(OLD_CMAKE_REQUIRED_FLAGS ${CMAKE_REQUIRED_FLAGS})
set(OLD_CMAKE_REQUIRED_LIBRARIES ${CMAKE_REQUIRED_LIBRARIES})
set(CMAKE_REQUIRED_FLAGS "-std=c++0x")
- check_cxx_source_compiles("-#include <atomic>-std::atomic<float> x(0.0f);-int main() { return (float)x; }"- LLVM_NO_OLD_LIBSTDCXX)- if(NOT LLVM_NO_OLD_LIBSTDCXX)- message(FATAL_ERROR "Host Clang must be able to find libstdc++4.7 or newer!")- endif()+# check_cxx_source_compiles("+##include <atomic>+#std::atomic<float> x(0.0f);+#int main() { return (float)x; }"+# LLVM_NO_OLD_LIBSTDCXX)+# if(NOT LLVM_NO_OLD_LIBSTDCXX)+# message(FATAL_ERROR "Host Clang must be able to find libstdc++4.7 or newer!")+# endif()
set(CMAKE_REQUIRED_FLAGS ${OLD_CMAKE_REQUIRED_FLAGS})
set(CMAKE_REQUIRED_LIBRARIES ${OLD_CMAKE_REQUIRED_LIBRARIES})
endif()
The libclang.dll was built in 37m:29s and it was 14.8 MB in size.
Clang 3.7.0 32 bit is more than two times slower than Visual C++ 2015 32 bit and the binaries
produced are almost double the size! Let’s see how it performs!
The mean value for registerTranslationUnitsForEditor for the Visual C++ kit was 9286.1 ms, and for the MinGW kit was 7692.4 ms.
The clang 3.7.0 32 bit binary was faster than the Visual C++ 2015 32 bit binary!
Compiling with CMake without any patches took 23m:16s. The stripped libclang.dll was 15.6 MB in size.
The 64 bit compilation was slower than the 32 bit, like for the other compilers, but the 64 bit binary size was smaller!
The mean value for registerTranslationUnitsForEditor for the Visual C++ kit was 10509.3 ms, and for the MinGW kit was 7637.5 ms.
The 64 bit binary was slower than the 32 bit binary. For the Visual C++ kit it was the slowest of them all :anguished:
I double checked the MinGW 5.3.0 64 bit performance with another distro – Nuwen. There was some improvement, but
same behavior: worse than 32 bit and the Visual C++ kit was slow.
The mean value for registerTranslationUnitsForEditor for the Visual C++ kit was 9939.4 ms, and for the MinGW kit was 7410.2 ms.
Profile-guided optimization (PGO)
Next I’m going to build libclang optimized to compile Text3.cpp. I will use Profile Guided Optimization for this.
To do a PGO build one needs to:
set some special flags for compiler and linker to do an instrumented build
train the build with the use cases – in my case open Text3.cpp
set other special flags for compiler and linker and do the final PGO build
I will do a Visual C++ 2015 64 PGO build and MinGW 5.3.0 32 and 64 bit. I left out Clang 3.7.0 because the “cl” driver
doesn’t support the PGO flags.
Visual C++ 2015 64 bit PGO
To enable PGO one needs to edit llvm-3.6.2.src\CMakeLists.txt and add the following lines:
Then do the regular CMake build. The 64 PGO build took 16m:32s. That is less than the regular build. I suspect
the /GL flag which means enable link-time code generation, thus moving some computational time from compilation time
to linking time. The binary size grew to 25.3MB and nearby was a 84.7 MBlibclang.pgd file.
That was the first part.
Then I decided to do training separate for each kit Visual C++ and MinGW.
The Visual C++ registerTranslationUnitsForEditor reported a whopping 226615 ms, that is just 24.5 times slower :smile:
The MinGW registerTranslationUnitsForEditor reported 148566 ms, that is just 17.9 times slower.
This is another indication that Visual C++ system headers require more computation power than MinGW’s.
The training step did produce two files (because I have opened Text3.cpp twice): libclang!1.pgc and libclang!2.pgc.
For Visual C++ kit they were 12.0MB in size, for MinGW kit they were 12.8MB in size. It recorded more information for
MinGW in less time. Curious.
The final step is to copy the pgc files in the build directories close to libclang.pgd and perform the final optimization.
Unfortunately my CMake-fu is poor and when I have swapped /LTCG:PGINSTRUMENT for /LTCG:PGOPTIMIZE in CMakeLists.txt
CMake didn’t to the expected thing, so I had to delete libclang.dll and manually edit build.ninja and replace the values.
After that cmake -E time ninja libclang took for Visual C++ 6m:39s and for MinGW 7m:14s.
Visual C++ prints some nice infos when it does the PGO linking.
Here’s the Visual C++ version:
$ cmake -E time ninja libclang
[1/1] Linking CXX shared library bin\libclang.dll
Merging bin\libclang!1.pgc
bin\libclang!1.pgc: Used  5.0% (12657888 / 255700992) of total space reserved.  0.0% of the counts were dropped due to overflow.
Merging bin\libclang!2.pgc
bin\libclang!2.pgc: Used  5.0% (12667264 / 255700992) of total space reserved.  0.0% of the counts were dropped due to overflow.
  Reading PGD file 1: bin\libclang.pgd
   Creating library lib\libclang.lib and object lib\libclang.exp
Generating code

0 of 0 ( 0.0%) original invalid call sites were matched.
0 new call sites were added.
64 of 190350 (  0.03%) profiled functions will be compiled for speed, and the rest of the functions will be compiled for size
1123298 of 2227108 inline instances were from dead/cold paths
190341 of 190350 functions (100.0%) were optimized using profile data, and the rest of the functions were optimized without using profile data
276441555770 of 276441555770 instructions (100.0%) were optimized using profile data
Finished generating code
And the MinGW version:
$ cmake -E time ninja libclang
[1/1] Linking CXX shared library bin\libclang.dll
Merging bin\libclang!1.pgc
bin\libclang!1.pgc: Used  5.3% (13502496 / 255700992) of total space reserved.  0.0% of the counts were dropped due to overflow.
Merging bin\libclang!2.pgc
bin\libclang!2.pgc: Used  5.3% (13574856 / 255700992) of total space reserved.  0.0% of the counts were dropped due to overflow.
  Reading PGD file 1: bin\libclang.pgd
   Creating library lib\libclang.lib and object lib\libclang.exp
Generating code

0 of 0 ( 0.0%) original invalid call sites were matched.
0 new call sites were added.
223 of 190350 (  0.12%) profiled functions will be compiled for speed, and the rest of the functions will be compiled for size
1120831 of 2256102 inline instances were from dead/cold paths
190341 of 190350 functions (100.0%) were optimized using profile data, and the rest of the functions were optimized without using profile data
99269434860 of 99269434860 instructions (100.0%) were optimized using profile data
Finished generating code
The huge number of instructions at the end seem erroneous, most likely a bug :smile:
The PGO optimized libclang.dll was for Visual C++ 7.84 MB in size, and for MinGW 8.01 MB in size.
The Visual C++ PGO mean value for registerTranslationUnitsForEditor for the Visual C++ kit was 8039.2 ms, and for the MinGW kit was 6705.2 ms.
The MinGW PGO mean value for registerTranslationUnitsForEditor for the Visual C++ kit was 7913.7 ms, and for the MinGW kit was 6289.6 ms.
It seems the MinGW training data was beneficial also for Visual C++ kit. 14% speed increase for Visual C++ and 24% for MinGW.
One last thing to mention is the size of the whole libclang build. Normal build directory was 650MB in size, but the PGO build directory was 9GB!!!
Right now libclang build with Visual C++ 2015 64 bit and PGO optimized is the fastest binary. The approximately 6 seconds target was reached!
Mingw-w64 GCC 5.3.0 32 bit PGO
MinGW also requires editing of llvm-3.6.2.src\CMakeLists.txt to enable PGO:
Then do a regular CMake build. The build took 26m:24s, a bit more than the normal build. The stripped libclang.dll was 41.8 MB in size.
GCC’s PGO is different than Visual C++’s. There are no pgd like files generated. During the training there are gcda files generated directly
nearby to the build obj files. You can change the directory where the files are generated with a compiler switch, but this just fine.
I have done also separate Visual C++ and MinGW trainings.
The Visual C++ registerTranslationUnitsForEditor reported a 27789 ms, that is just 3.3 times slower.
The MinGW registerTranslationUnitsForEditor reported 18388 ms, that is just 2.5 times slower.
That is way better than the Visual C++ PGO penalty!
For the final step I have hacked again build.ninja and replaced -fprofile-generate with -fprofile-use. The build times were 21m:12s for Visual C++
and 20m:56s for MinGW case.
Unfortunately MinGW GCC doesn’t produce any PGO statistical information.
The PGO optimized libclang.dll was for Visual C++ 14.3 MB in size, and for MinGW 14.5 MB in
The Visual C++ PGO mean value for registerTranslationUnitsForEditor for the Visual C++ kit was 6980.5 ms, and for the MinGW kit was 6276.2 ms.
The MinGW PGO mean value for registerTranslationUnitsForEditor for the Visual C++ kit was 7420.5 ms, and for the MinGW kit was 6141.8 ms.
For MinGW 5.3.0 32 bit the instrumented cases produced the fastest times. 16% speed increase for Visual C++ and 16.2% for MinGW.
Mingw-w64 GCC 5.3.0 64 bit PGO
The 64 bit MinGW PGO procedure is the same as for 32 bit. Instrumented build took 30m:10s, binary size was 36.4 MB.
The Visual C++ registerTranslationUnitsForEditor reported a 27751 ms, that is just 2.6 times slower.
The MinGW registerTranslationUnitsForEditor reported 16766 ms, that is just 2.2 times slower.
The optimized build took 23m:41s for Visual C++ and 26m:48s for MinGW. For MinGW I had to restart the procedure because
the first time the optimized build failed, some bad instrumentation.
The PGO optimized libclang.dll was for Visual C++ 13.2 MB in size, and for MinGW 13.4 MB in
The Visual C++ PGO mean value for registerTranslationUnitsForEditor for the Visual C++ kit was 8620.9 ms, and for the MinGW kit was 6516.8 ms.
The MinGW PGO mean value for registerTranslationUnitsForEditor for the Visual C++ kit was 9567.5 ms, and for the MinGW kit was 6545.9 ms.
For MinGW 5.3.0 64 bit the instrumented cases were 18% speed increase for Visual C++ and 14.2% for MinGW.
The 32 bit MinGW 5.3.0 version produced faster binaries than the 64 bit version.
Summary
I’ve gathered all the numbers in one table, for easier comparison:
Compiler
Time to compile
Binary size
Visual C++ kit
MinGW kit
Visual C++ 2013 32
-
7.65 MB
9533.1 ms
8248.3 ms
Visual C++ 2013 64
24m:26s
10.1 MB
9371.5 ms
8434.6 ms
Visual C++ 2015 32
16m:27s
7.60 MB
9541.9 ms
8238.3 ms
Visual C++ 2015 64
19m:10s
10.2 MB
9213.1 ms
8266.4 ms
Clang 3.7.0 32
37m:29s
14.8 MB
9286.1 ms
7692.4 ms
Clang 3.7.0 64
39m:12s
15.3 MB
8820.6 ms
7581.5 ms
MinGW 5.3.0 32
21m:36s
16.9 MB
8314.9 ms
7335.9 ms
MinGW 5.3.0 64
23m:16s
15.6 MB
10509.3 ms
7637.5 ms
MinGW 5.3.0 Nuwen
24m:31s
16.7 MB
9939.4 ms
7410.2 ms
Visual C++ 2015 64 Visual C++ PGO
25m:11s+
7.84 MB
8039.2 ms
6705.2 ms
Visual C++ 2015 64 MinGW PGO
25m:46s+
8.01 MB
7913.7 ms
6289.6 ms
MinGW 5.3.0 32 Visual C++ PGO
47m:36s+
14.3 MB
7420.5 ms
6141.8 ms
MinGW 5.3.0 32 MinGW PGO
47m:20s+
14.5 MB
6980.5 ms
6276.2 ms
MinGW 5.3.0 64 Visual C++ PGO
53m:51s+
13.2 MB
8620.9 ms
6516.8 ms
MinGW 5.3.0 64 MinGW PGO
56m:58s+
13.4 MB
9567.5 ms
6545.9 ms
MinGW 5.3.0 32 bit is the winner in normal and PGO mode.
In normal mode Visual C++ kit is 12.7% faster, MinGW kit is 11.0% faster than the provided Visual C++ 2013 32 bit libclang.dll.
The PGO libclang.dll is for Visual C++ kit 26.7% faster, MinGW kit is 25.5% faster than the libclang.dll that comes with Qt Creator 3.6.0.
By choosing the MinGW kit instead of the Visual C++ kit one benefits of 23% speed increase in normal mode, respectively 12.0% speed increase in PGO mode.
So next time code completion is slow in Qt Creator, do something about it! :sunglasses:
Downloads
I have 7zipped all the libclang.dll versions in an archive.
To use the 64 bit versions I have also 7zipped my Visual C++ 2013 64 bit build of Qt Creator 3.6.0.
The above links are self-extracting 7zip archives.
Which libclang.dll performed better on your project? Comment below. Thanks!
]]><![CDATA[QtCreator and Google Test]]>2015-12-13T09:50:29+01:00https://cristianadam.eu/20151213/qtcreator-and-google-testIn this article I will have a look on how to get started with Google Test libraries on
Windows using Qt Creator for both MinGW and Visual C++.
I used the plural for Google Test libraries because there is Google Test – Google’s C++
test framework and also Google Mock – Google’s C++ mocking framework. They both are
hosted on a single location on github.
Unfortunately the 2015 migration from Google Code to Github broke a lot of documentation
search page links for Google Test, not to mention that the code snippets lost the
syntax highlighting. :disappointed:
First step would be to get the master bundle zip package for both Google Mock and Google Test libraries.
Then unpack the googletest-master.zip file into a directory e.g. Projects/GMock/Turtle.
Then create a CMakeLists.txt file with the following content:
add_subdirectory (googletest-master) will add the GMock and GTest include directories so we don’t have to.
set (gtest_disable_pthreads on) is needed for MinGW, otherwise we will get errors like:
C:/Projects/gmock/turtle/googletest-master/googletest/include/gtest/
internal/gtest-port.h:1782:3: error: 'AutoHandle' does not name a type

   AutoHandle thread_;

   ^
config_compiler_and_linker() is required for Visual C++, which otherwise we will have linking errors like:
gtest.lib(gtest-all.cc.obj) : error LNK2038: mismatch detected for
'RuntimeLibrary': value 'MTd_StaticDebug' doesn't match value
'MDd_DynamicDebug' in mock_turtle_test.cpp.obj
Now all that is needed is the code for mock_turtle_test.cpp.
The code mocks the Turtle interface and makes sure that Painter::DrawCircle will issue a call to Turtle::GoTo with
100 and 50 argument values, and a call to Turtle::PenDown().
Success
Open the CMakeLists.txt file with Qt Creator and compile and run the project! Here is a screen-shot from my machine:
Failure
But what happens if a tests fails? I have changed the argument from DrawCircle from 100 to 101. If I compile and run
I will get the following:
We can see that the test has failed. But how can we go to the line that failed? Qt Creator has highlighted
the error, but it can’t actually go to the line in question.
Test runner MinGW
Since Google Test will output the file and line that failed, we just need to make Qt Creator to parse the
output.
We will achieve this by adding a simple line in CMakeLists.txt namely:
add_custom_target(unittest ${PROJECT_NAME})
Now we have a new target to the project named unittest which will run our test. But how do we run this
target from Qt Creator? By typing cm (shorthand for cmake) in the locator bar!
After running the cm unittest the following happened:
We can see that in the bottom right the build progress bar is red and we got a list of issues.
After double-clicking the first line we jumped to the line that failed :sunglasses:
Qt Creator should have treated this failure as an error and should have shown an error icon
at line 50. I have opened up QTCREATORBUG-15505.
Test runner Visual C++
Compiling and running the failure test looks like this:
We can see that the error is being highlighted, which means that the output is parsed.
Now let’s try cm unittest:
The build is marked as red, but unfortunately the issues list is empty! :disappointed:
Using Google Test with Qt Creator is easy to setup and, with a bit of hacking, easy to use!
]]><![CDATA[Total Commander and SFTP]]>2015-09-27T19:11:59+02:00https://cristianadam.eu/20150927/total-commander-and-sftpHaving moved my blog to a static blogging engine means that now I have to upload the
generated blog html files to on a server. Octopress recommends deoploying using Rsync via SSH.
Since I do my hacking on a Windows machine and I use Total Commander for file management
I thought I would give Total Commander’s SFTP plugin a try.
I like to think that I am power user when it comes to Total Commander, but I ended up
installing WinSCP to upload the files via SSH. I couldn’t figure out the right combination
of DLL dependencies that Total Commander’s SFTP plugin requires.
Q: Why doesn't Total Commander support a connection by SSH?
A: Unfortunately we cannot support any encryption in Total Commander because of the current patent and crypto export situation. However, there is now a new file system plugin for Total Commander, which supports SFTP. SFTP is FTP via SSH. It needs SSH2, which is now supported by almost all new Linux and other Unix distributions.
Since my blog is hosted in Germany, and Germany doesn’t have a crypto export situation, I thought of
building the Total Commander’s SFTP plugin together with its dependencies.
Total Commander’s SFTP plugin has libssh2 as a dependency. libssh2 has
OpenSSL and zlib dependencies.
After a bit of fiddling with the SFTP plugin’s
code I present you below version 1.4.2 of the SFTP plugin with batteries included:
Octopress is advertised as “a blogging framework for hackers”. As a hacker one “should be comfortable running shell
commands and familiar with the basics of Git”. But it all comes down to ruby.
If you’re a Windows hacker what do you do? My first idea was to install Cygwin.
For tastatura.info I’ve used Cygwin to run Octopress. I had a laptop with an Intel Core i7 CPU, didn’t notice any slowdowns.
By the time I’ve moved this blog to Octopress I didn’t have access to that Intel Core i7 powered laptop, but instead I had an Intel
Core 2 Duo powered laptop. Then I’ve noticed that Octopress was rather slow on Cygwin.
That’s when I’ve started looking for alternatives to Cygwin.
The other options for running Ruby on Windows are:
RubyInstaller - The easy way to install Ruby on Windows
Running Ruby on Linux in a virtual machine
Compiling Ruby by myself :smile:
Octopress requires a few ruby libraries (gems) which require a native C/C++ compiler.
RubyInstaller provides a development kit, which is a “MSYS/MinGW based toolkit than enables you to build many
of the native C/C++ extensions available for Ruby”.
Since Visual Studio 2013 Professional has been offered freely as the
Community Edition, I decided to use
Visual C++ to compile Ruby.
In my experience Visual C++ generates faster and smaller binaries than MinGW (GCC for Windows).
Before starting to compile Ruby one needs to compile some dependencies:
libffi - the worst of the lot, very unfriendly on Windows
Ruby can be compiled with Visual C++. Ruby provides a NMake
makefile script. Building with NMake can be very slow because it runs only on a CPU core. I’ve tried to use
Jom - the parallel NMake clone, unfortunately the Ruby makefile is not
parse-able by Jom, it was complaining about some recursive declarations.
I haven’t mentioned the Ruby version I was trying to compile and when I’ve done this exercise.
I’ve compiled ruby 2.0.0p598 at the beginning of March, I’ve chosen ruby 2.0 because at that time the
newer version was crashing at runtime. Also that’s the same ruby version that Cygwin was providing back then.
Ruby 2.0.0.p598 doesn’t compile successfully out of the box with Visual C++ 2013 64bit.
Compiling Ruby is not enough, one needs to compile the required gems for Octopress.
Bundler will try to compile the missing gems when you issue bundle install. This is
why one needs to run all these commands from VS2013 x64 Native Tools Command Prompt.
Now I had a running Octopress setup. But after a quick benchmark I’ve noticed that
the RubyInstaller had a faster binary build with MinGW 4.7.2 x64 :disappointed:
Then I decided to do a Profile Guided Optimization (PGO) build. This required a few modifications
for Makefile.sub: OPTFLAGS = -O2sy- -GL and LDFLAGS = -incremental:no -debug -opt:ref -opt:icf -force:multiple -LTCG:$(LTCG).
I had LTCG as a shell variable because one needs to compile the binaries twice and editing Makefile.sub
would trigger a rebuild. The value for $(LTCG) is set first as /LTCG:PGINSTRUMENT and after instrumentation set as /LTCG:PGOPTIMIZE or /LTCG:PGUPDATE.
I also had to hack mkexports.rb to export all final symbols instead of progressively gather them from
the shared objects.
At the end I had an PGO optimized build for Octopress which was faster than RubyInstaller :metal:
And now for some numbers. I have tested RubyInstaller x64, ruby 2.0 installed on a Kubuntu 14.10 x86 on Virtual Box
and VMware Player, ruby 2.0 installed on Kubuntu 14.10 x64 on the same machine, Cygwin x64. The Core 2 Duo laptop
was not able to run x64 virtual machines, that’s due to a hardware limitation.
I used MSys Git (because it had bash and no ruby) to run this script for tastatura.info:
#!/bin/bash
for i in {1..2}; do rake generate; done
time for i in {1..10}; do rake generate; done
This means that the times below are for ten rake generate commands:
Ruby
Time
Time with antivirus enabled
ruby 2.0.0p598 [x64-mingw32] RubyInstaller
2m7.343s
2m32.256s
ruby 2.0.0p598 [x64-mswin64_120] Visual C++ 2013
2m17.998s
2m43.675s
ruby 2.0.0p598 [x64-mswin64_120] Visual C++ 2013 PGO Optimized
2m2.117s
2m27.561s
ruby 2.0.0p598 [x86_64-cygwin] Cygwin
7m12.776s
7m35.724s
ruby 2.0.0p457 [i386-linux-gnu] VMware Player 7.1.0
From these numbers we can see that running ruby on Cygwin is a bad idea.
Running ruby in a virtual machine with VMware Player was the fastest option on Windows.
Running ruby on Linux natively produced the fastest results.
The antivirus penalty seems to be similar for all Windows options.
tastatura.info had like ten articles, therefore I decided to test my old blog entries imported
into Octopress. My old blog had like one hundred articles.
Ruby
Time
Time with antivirus enabled
ruby 2.0.0p598 [x64-mingw32] RubyInstaller
5m52.670s
6m19.283s
ruby 2.0.0p598 [x64-mswin64_120] Visual C++ 2013
6m50.686s
7m18.096s
ruby 2.0.0p598 [x64-mswin64_120] Visual C++ 2013 PGO Optimized
5m23.810s
5m48.801s
ruby 2.0.0p598 [x86_64-cygwin] Cygwin
11m14.888s
11m42.282s
ruby 2.0.0p457 [i386-linux-gnu] VMware Player 7.1.0
The results are a bit different. Cygwin is still slow, but now the fastest option on Windows is
no longer VMware Player but instead the PGO Visual C++ build. Ruby on Linux is still the fastest
option for that Core 2 Duo laptop. The difference from Linux and Windows PGO Visual C++ is not that
dramatic.
Below you have the Visual C++ 2013 ruby 2.0.0p598 x64 binaries:
In order to use them you need to install Visual Studio Community Edition.
Install the patched ruby gems gem install --local path_to_gem/filename.gem from the VS2013 x64 Native Tools Command Prompt window.
After a successful bundle install one just needs to run Ruby-x64-pgo\setrbvars.cmd from a
command prompt and then the usual rake new_post[""], rake generate, or rake preview commands!
If you use Octopress on Windows, give this build a try :wink:
Grim Fandango is one of my favorite adventure games and when last year it was announced
that a remastered version will be available for PC, Mac, and Linux, it was too good to be true!
This year at the end of January I bought the Remastered (also available on Steam,
and GOG stores) version. But as it turns out I was not able to play the game on PC!
The following message box popped up when I tried to play the game!
On the DoubleFine forum the only solution to this problem was to buy new hardware, which is
due to the new features implemented in the remastered version.
The original specs were way below to my Lenovo X201 (Intel i5, 4GB Ram, SSD harddrive,
Intel GPU). I have ran GPU Caps Viewer and the result is below:
Note the OpenGL Version 2.1, game requires OpenGL Version 3.3. One can only think at this:
Solution
Grim Fandango Remastered has an option to switch between the Remastered version and the Original version. Original version used to run
on a Pentium at 133Mhz :smile:
What if we could run the Original version with a software OpenGL driver? Fortunately VMware Inc. has created LLVMPipe with Gallium3D which is used
by VMware Workstation and VirtualBox to emulate OpenGL on CPU.
Speaking of Virtual Machines, one could simply play the Original version from 1998 in a Virtual Machine, but there are some points against it:
The 1998 version is hard to get, monolingual (I own a German copy) and it comes on CDs, which might cause problems on laptops without a DVD drive.
The new mouse navigation makes the game easier to play.
Ability to switch the language of the game. It’s nice to see how good your Spanish, German, French, Italian, or Portuguese is!
Audio developer commentary.
On Steam Grim Fandango Remastered has 47 achievements you can unlock!
Comming back at the LLVMPipe, by following the instructions from buildllvmpipe, and
Mesa3D I was able to compile an opengl32.dll using Mesa 10.5.5 and LLVM 3.6.
I had to patch Mesa 10.5.5 to work with LLVM 3.6 though, diff is here.
Grim Fandango starts by default in Remastered version, which is not playable with LLVMPipe (too slow and has rendering artefacts).
One needs to configure the game to start in Original version. You can get a registry.sav from here
which you should copy in the Saves folder of Grim Fandango. Create the Saves folder if it doesn’t exist!
registry.sav is a binary file, the difference between Remastered and Original is below:
In order to use LLVMPipe one only needs to copy opengl32.dll in the same folder where GrimFandango.exe resides. GPU Caps Viewer shows that now I have
OpenGL version 3.3!
I have used Visual C++ 2013 to compile LLVMPipe, the resulting opengl32.dll was ~20MB in size. Next I have compiled a profiled guided optimization
(PGO) version which optimized only 21 functions for speed (0.02%) and the rest for size, and resulted in a ~15MB opengl32.dll file.
Theoretically the PGO version should ran faster, but without a benchmark one cannot know for sure :smile:
If you play the Steam version of Grim Fandango Remastered and audio is jerky please try again from Big Picture Mode.
Now everybody can play the original Grim Fandango on their PC! :metal:
P.S.
As it turns out, the game has a built-in switch to the Original rendering mode, without the need of the registry.sav file:
Start the game, press Esc key to go through the cut-scenes
Wait for the tube mail box animation to complete (the mail box flag will go up). This will take a few minutes
Press Backspace to switch to the Original rendering mode
]]><![CDATA[From Blogger to Octopress]]>2015-05-10T16:18:58+02:00https://cristianadam.eu/20150510/from-blogger-to-octopressI decided to move away from Blogger blogging service to Octopress,
which is “a framework designed for Jekyll, the static blogging engine powering Github Pages”.
I did the change because of two reasons:
Notifications for comments. When Google introduced Google+ comments to Blogger I did the
switch and for some unknown reason I am not receiving notification for comments on articles.
I have spent some time trying to fix this problem without success.
Syntax highlighting for code snippets. I was doing HTML exports from my text editor to
include in blog posts, followed by a bit of HMTL fiddling, which is not always fun.
Moving away from Google implies having to host my own content. One can get free hosting
at Github Pages, but I decided to have my own domain for a nicer
online presence :wink:
Octopress requires a Ruby installation, which for a Windows hacker is a bit alien.
I will explore the various options one has on Windows when it comes to Ruby in a future blog entry.
I have chosen Disqus to manage comments for the blog.
Octopress has some syntax highlighting support but is limited and one has too look
after something better. I’ve picked CodeRay.
diff -ur old/code_ray_block.rb new/code_ray_block.rb--- old/code_ray_block.rb Sun May 10 16:57:33 2015+++ new/code_ray_block.rb Sun Mar 15 11:11:13 2015@@ -48,12 +48,11 @@
require './plugins/pygments_code'
require './plugins/raw'+require 'coderay'moduleJekyllclassCodeRayBlock < Liquid::Block- include HighlightCode- include TemplateWrapperCaptionUrlTitle = /(\S[\S\s]*)\s+(https?:\/\/\S+|\/\S+)\s*(.+)?/iCaption = /(\S[\S\s]*)/@@ -96,7 +95,7 @@else
source += "#{CodeRay.scan(code, :text).div(:css => coderay_css, :line_numbers => line_numbers)} </figure>"end- source = safe_wrap(source)+ source = TemplateWrapper::safe_wrap(source)
source = context['pygments_prefix'] + source if context['pygments_prefix']
source = source + context['pygments_suffix'] if context['pygments_suffix']
source
There are tools which help to migrate content from Blogger to Octopress, but I decided to start fresh and
too keep the old blog and comments. One cannot migrate Google+ comments.
Some numbers from my old blog: ~100 articles written in ~10 years which
gathered ~120000 views.
Let’s see if this new blog will last ten years! :relaxed:
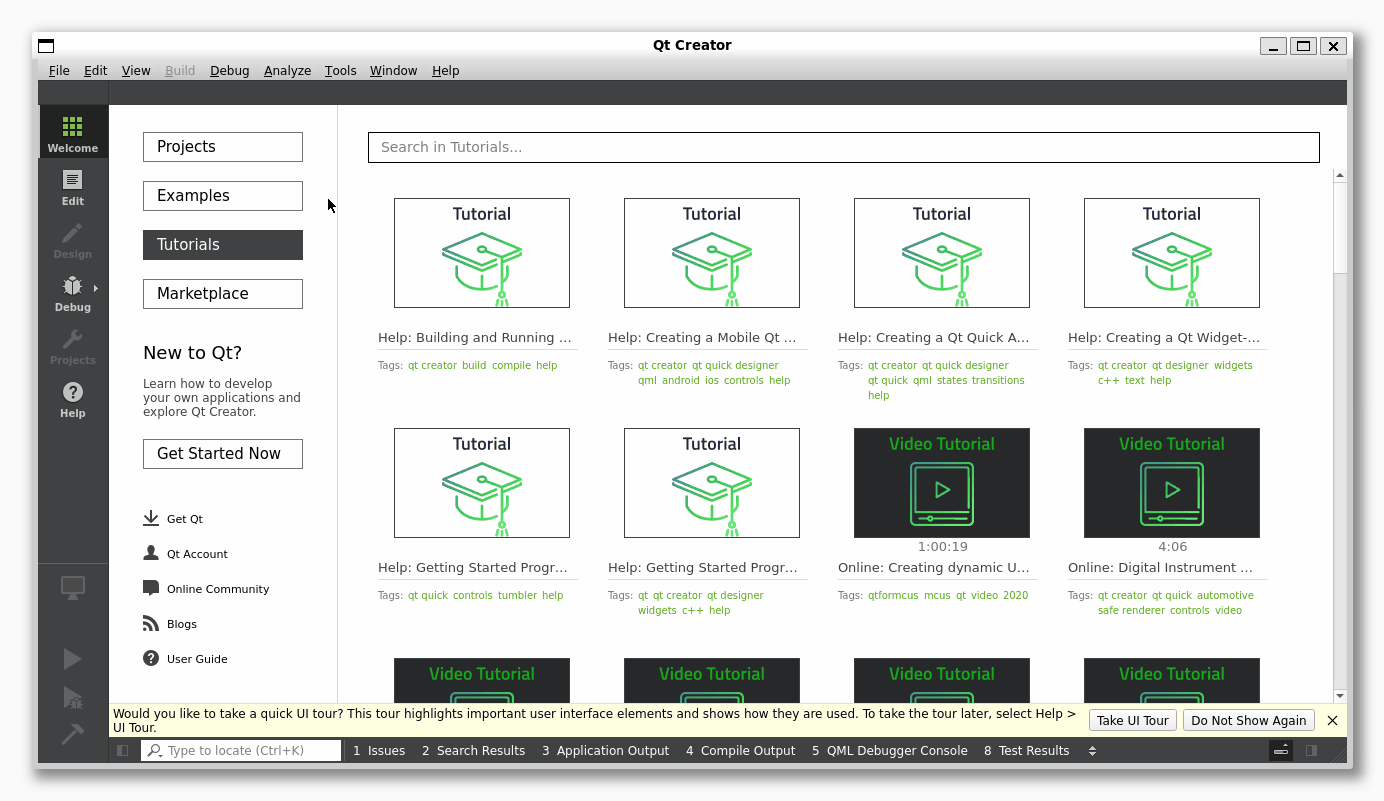
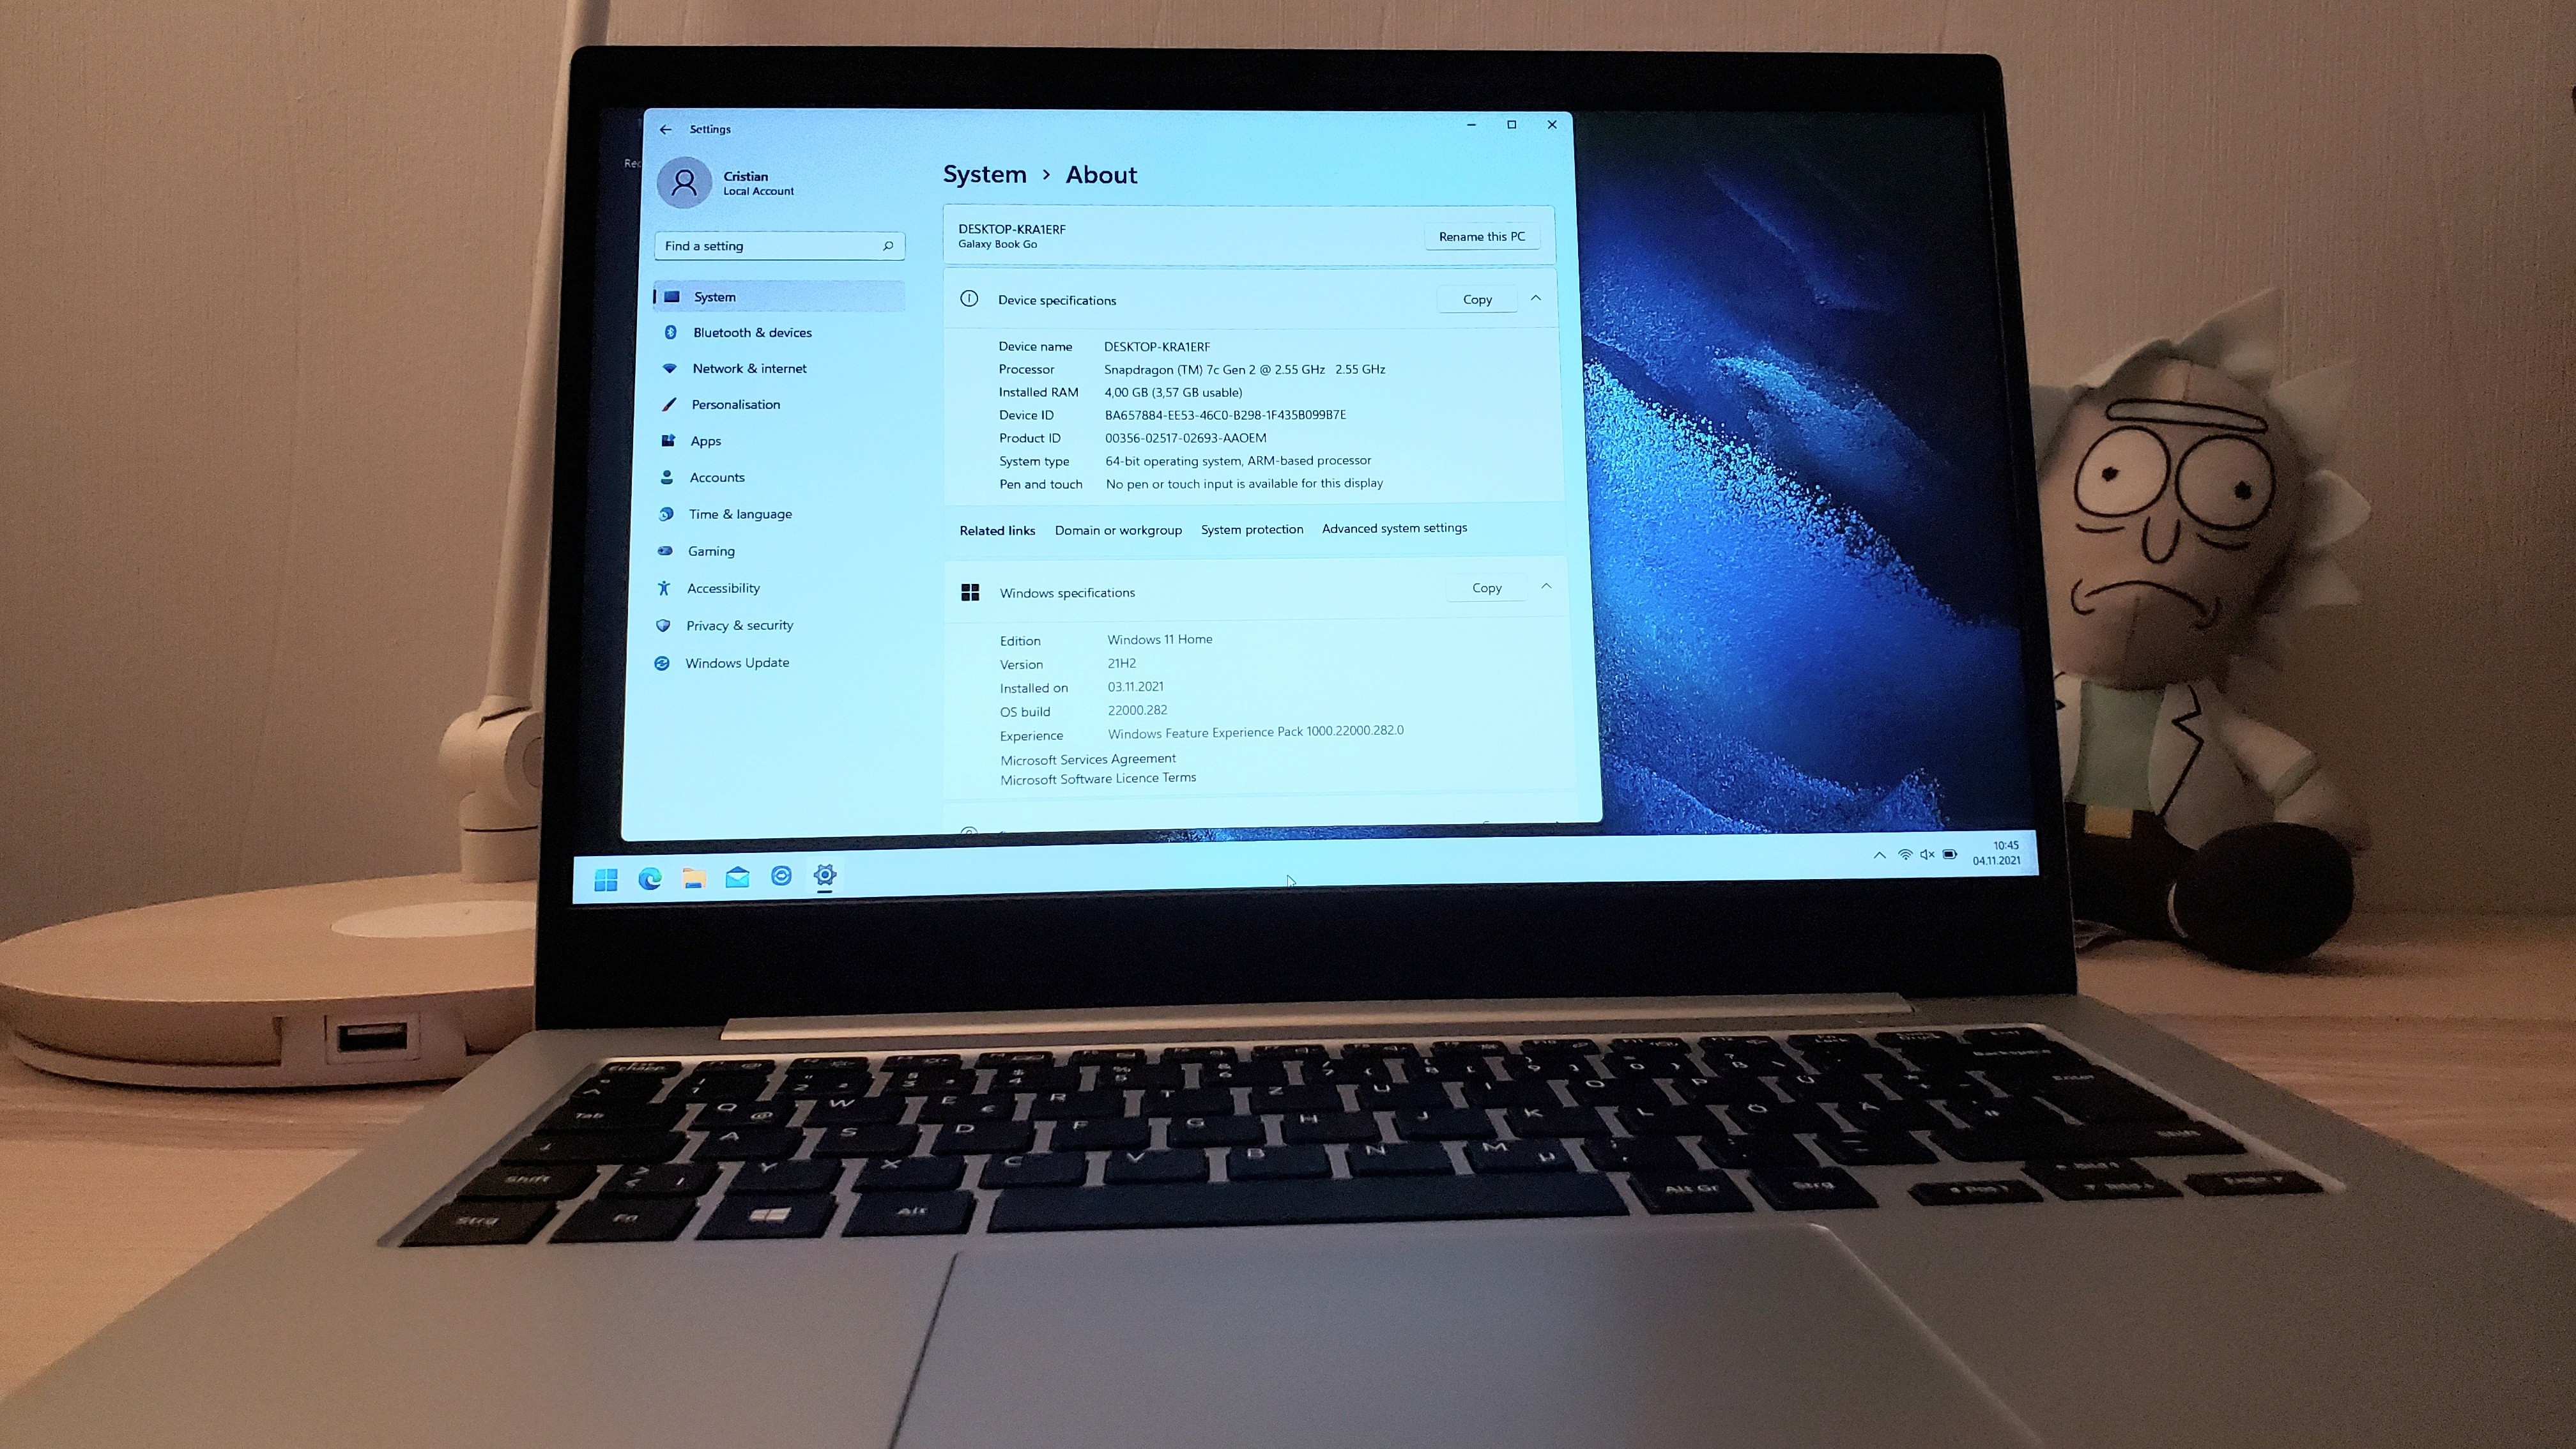

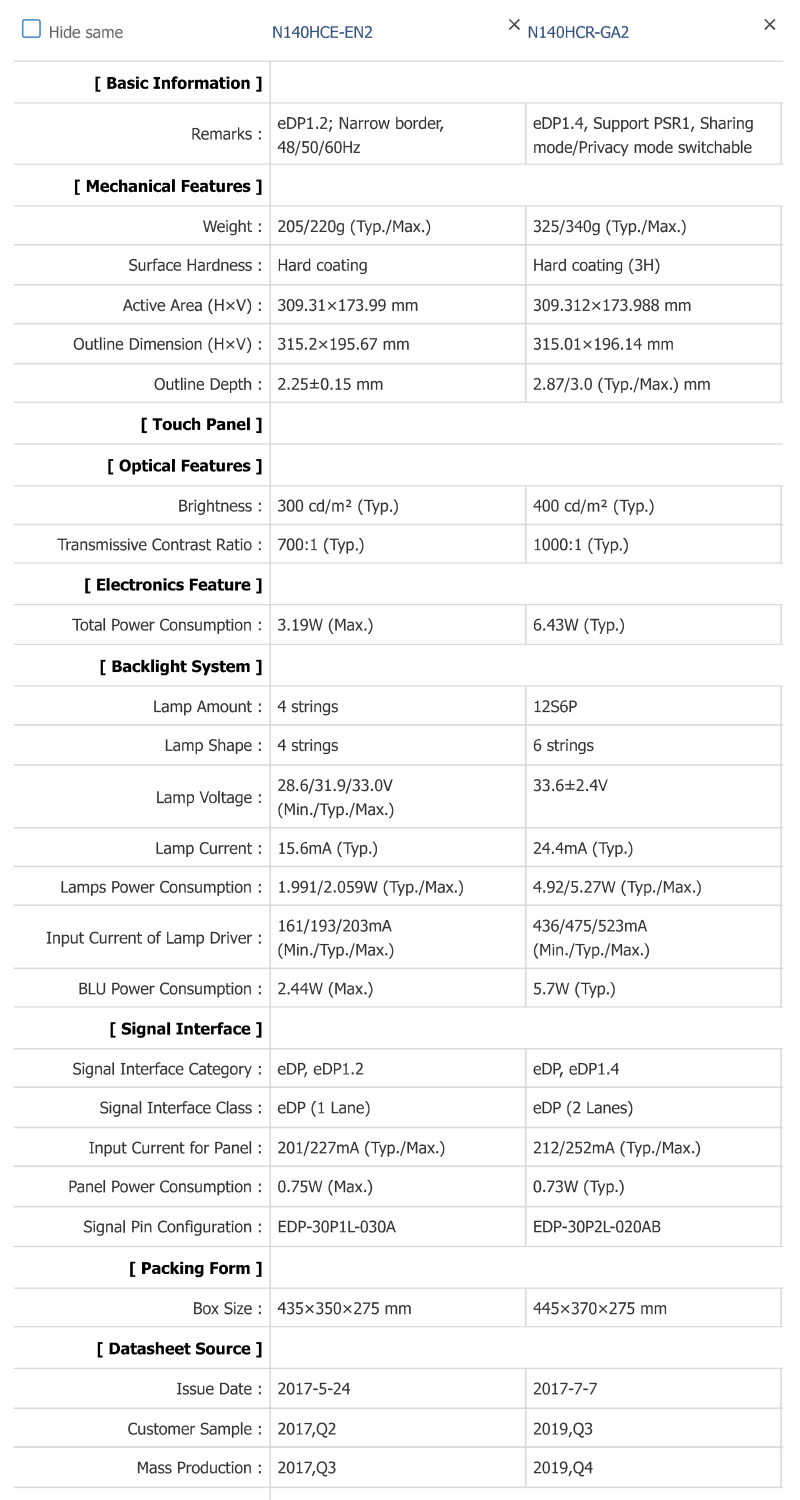
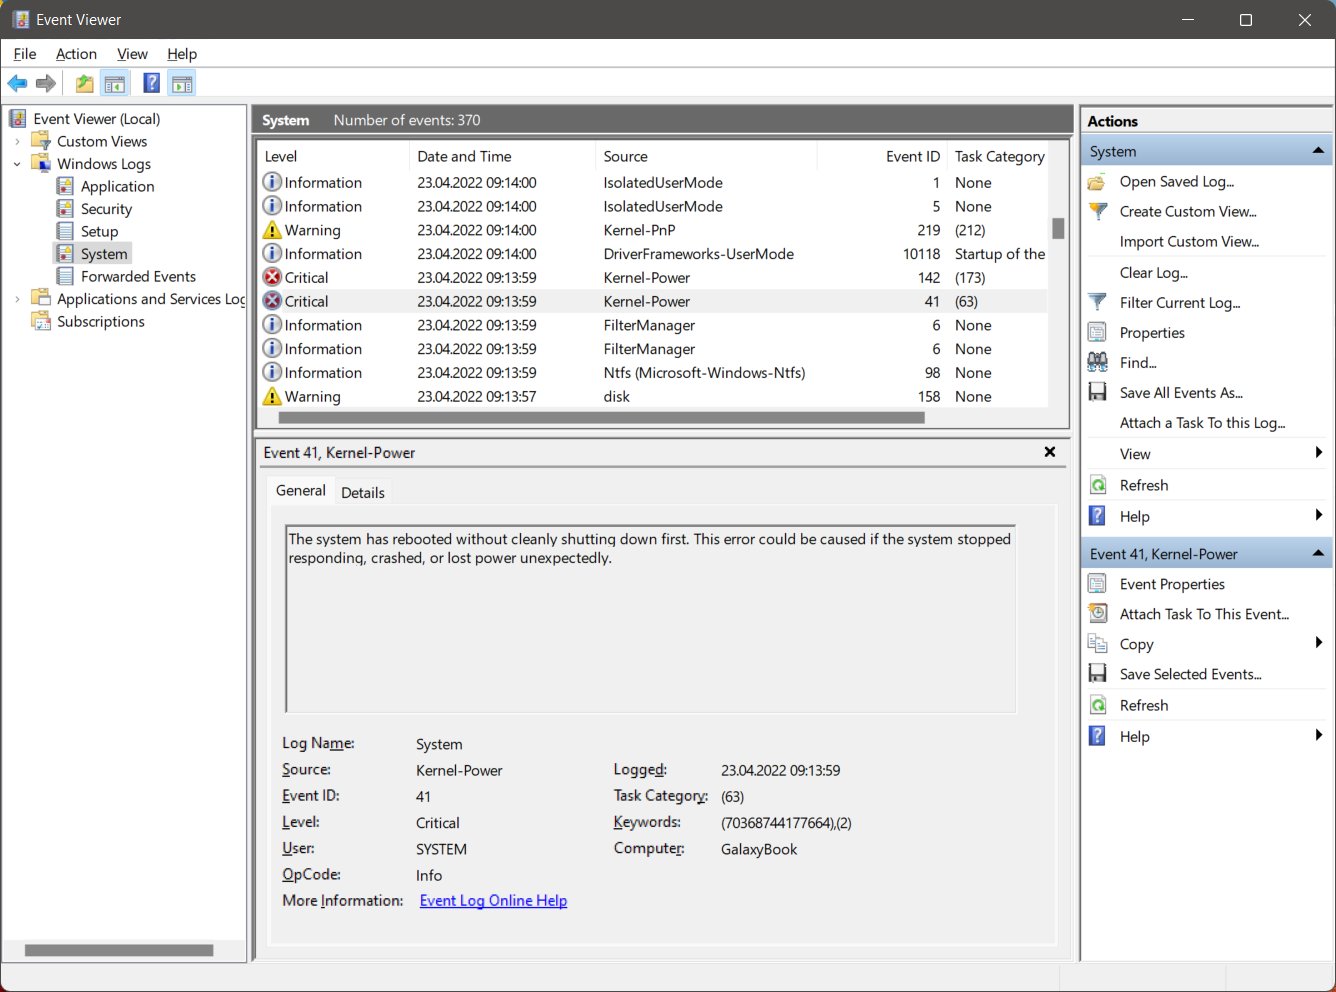


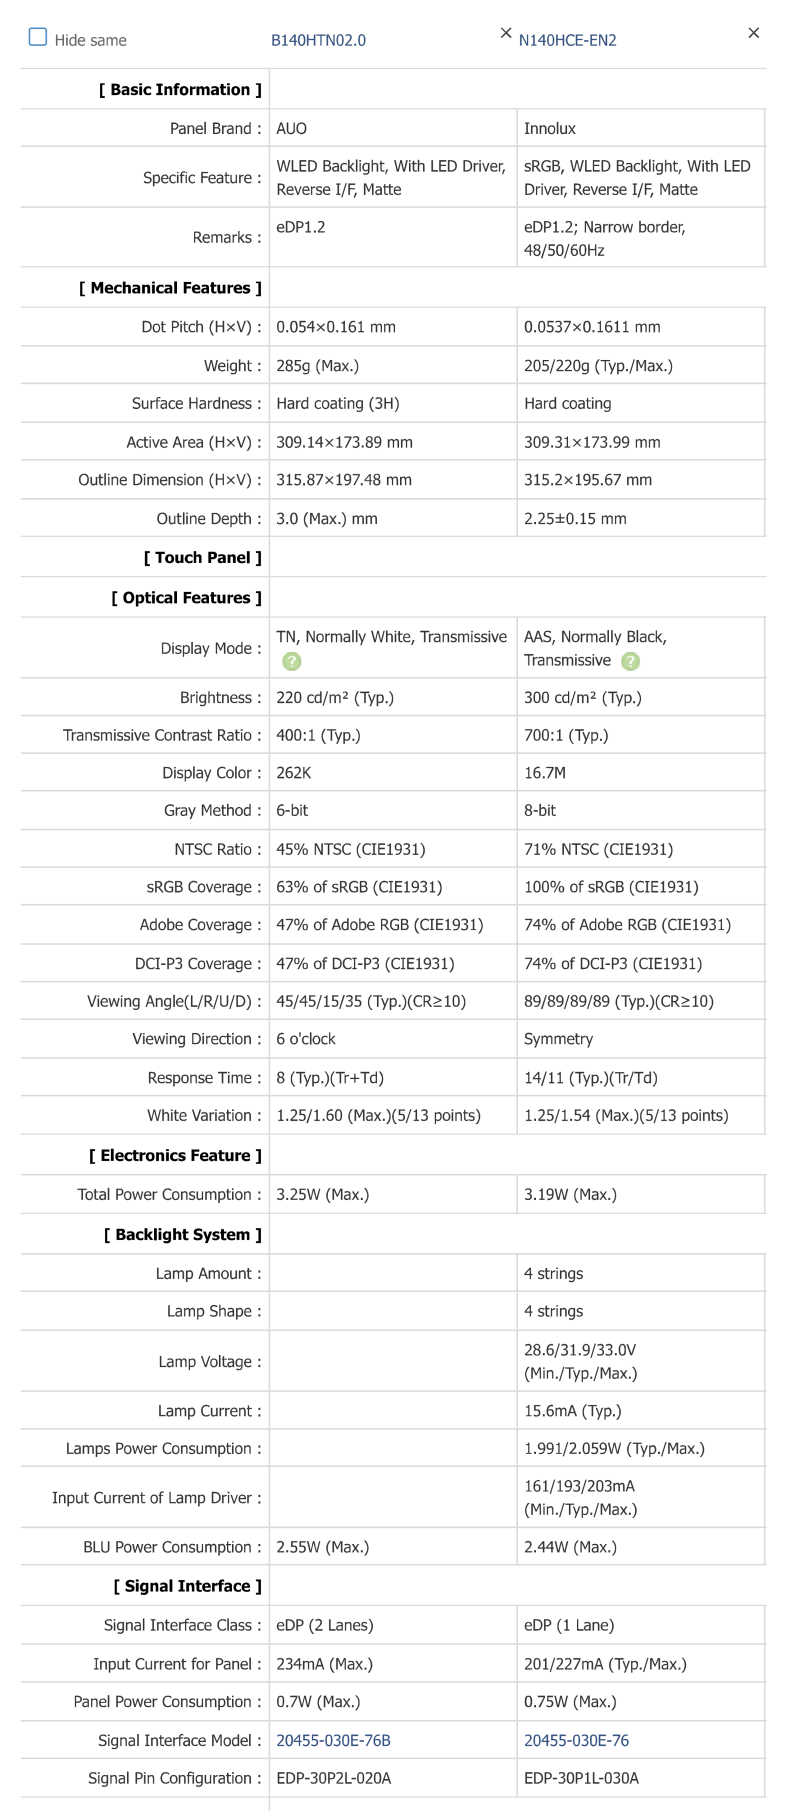
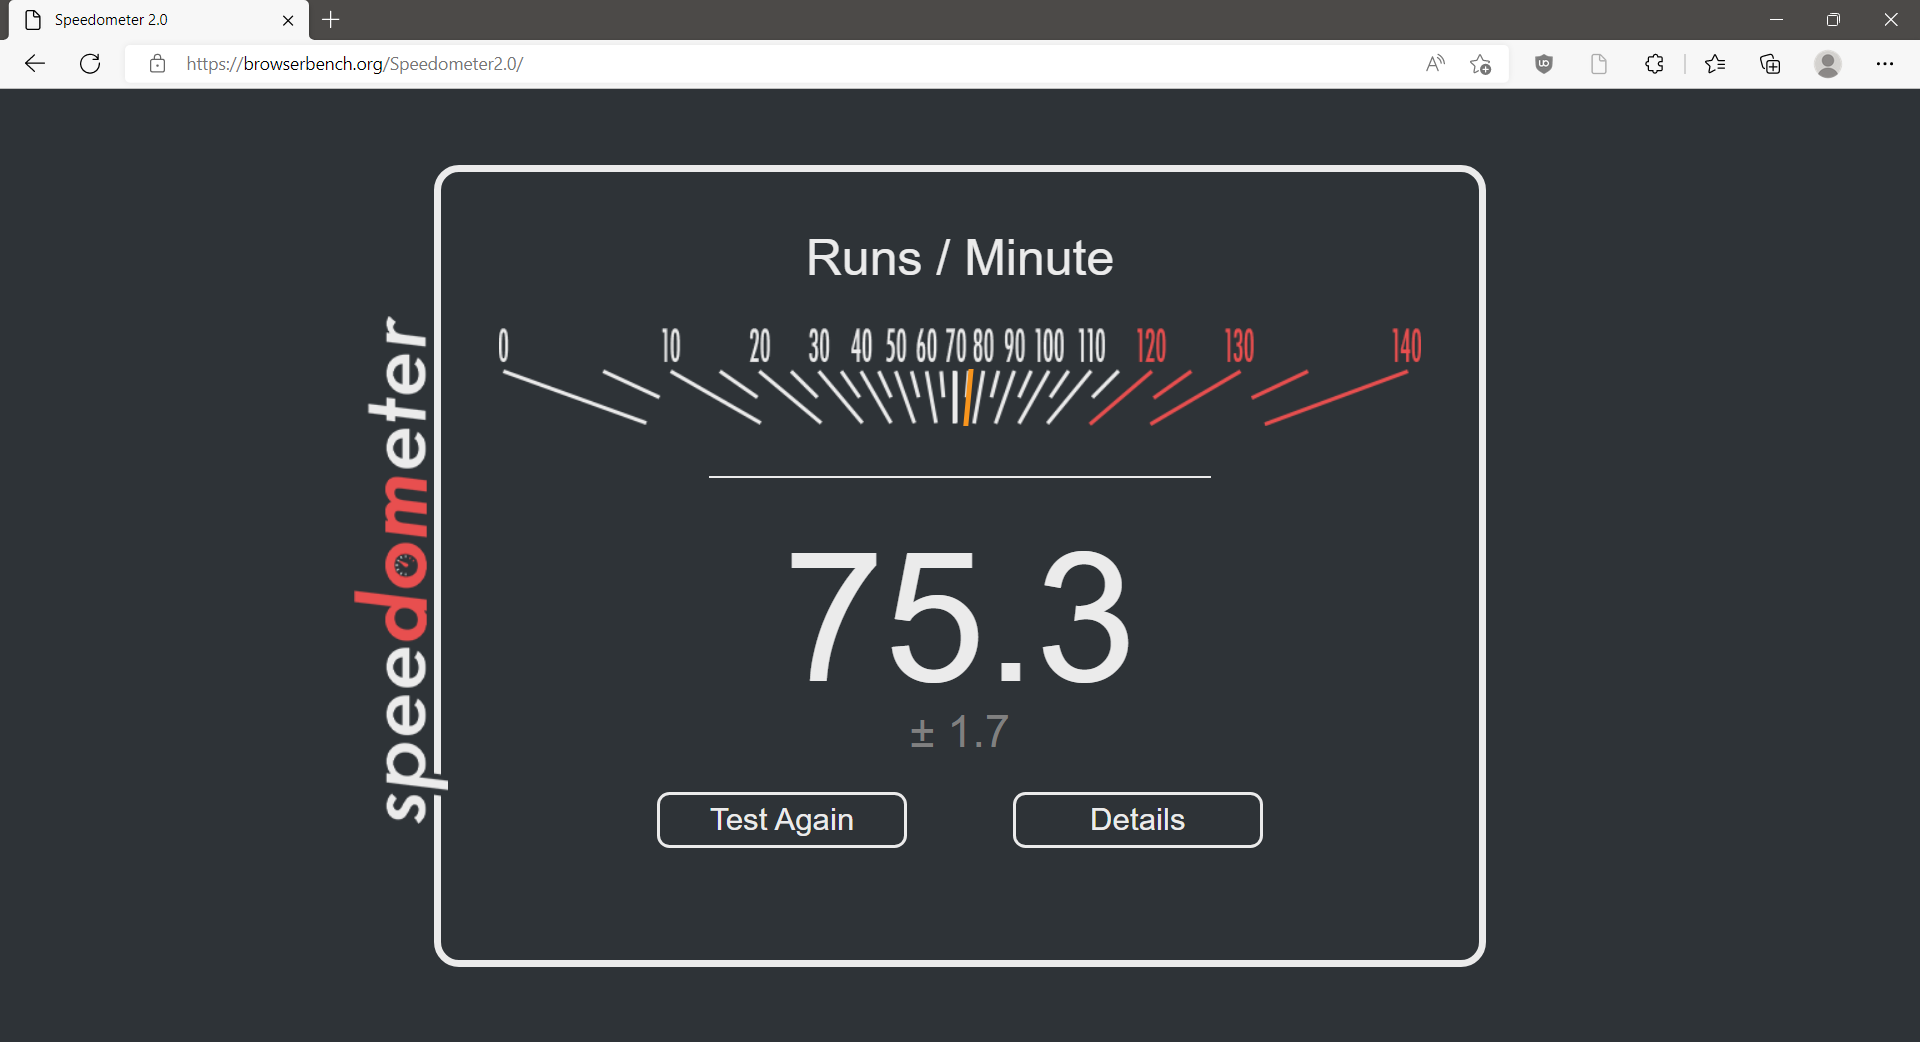
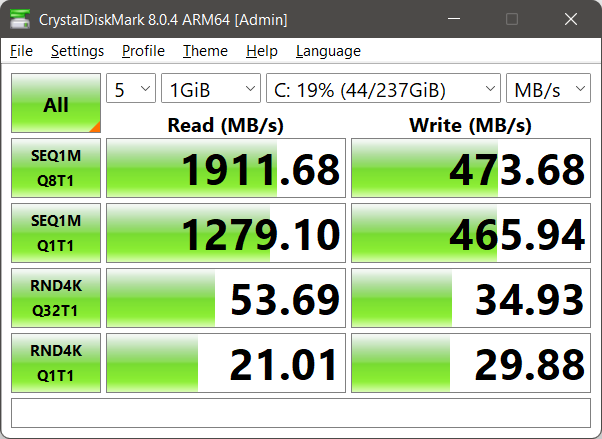
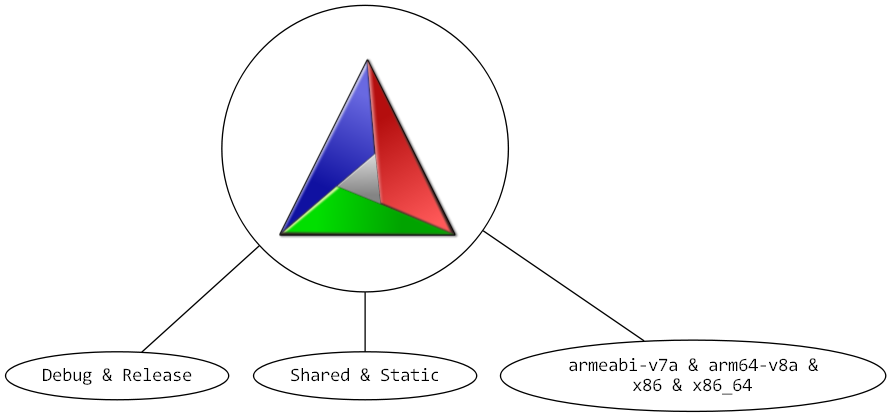

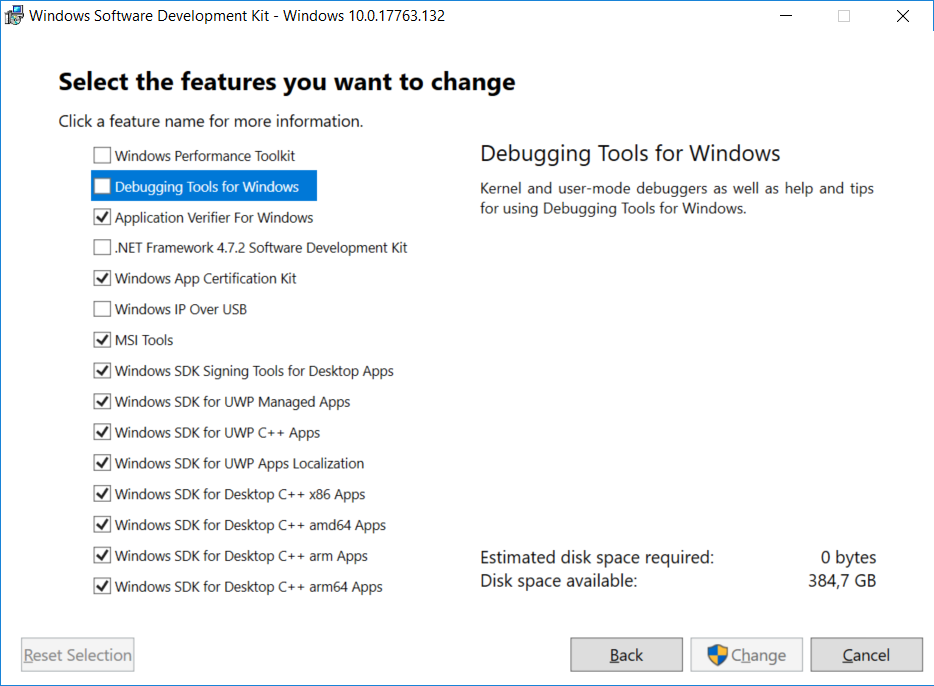
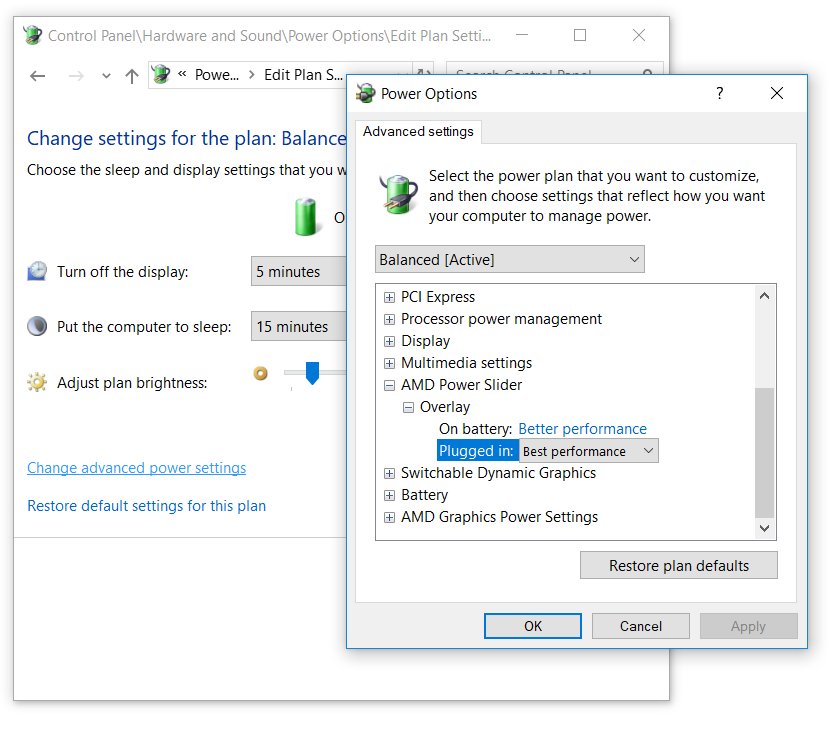
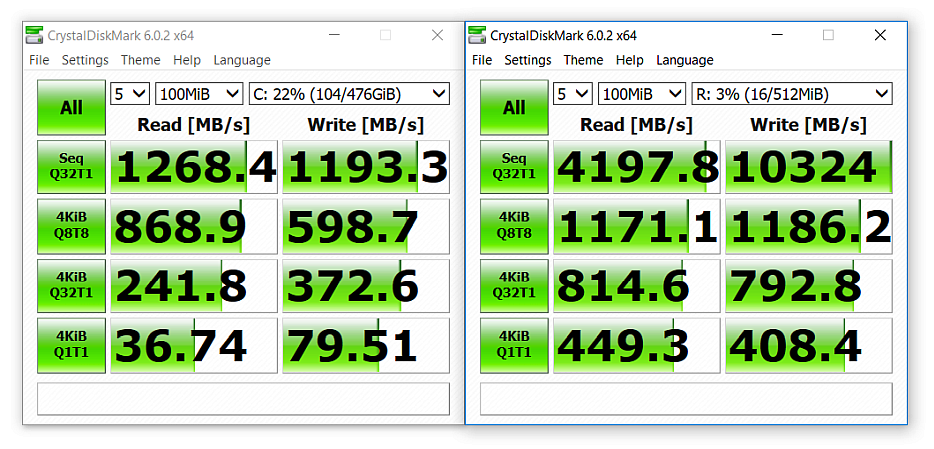
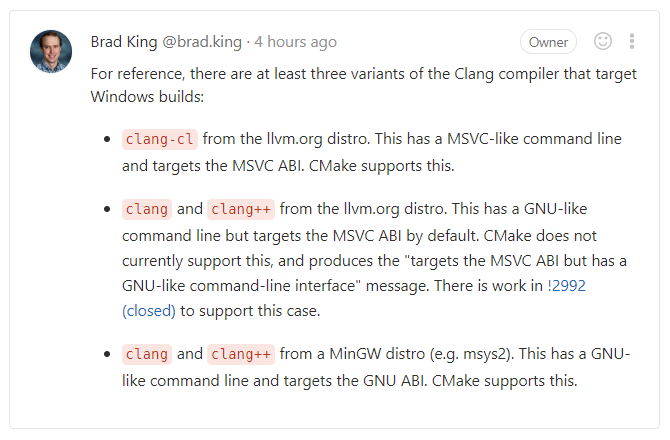

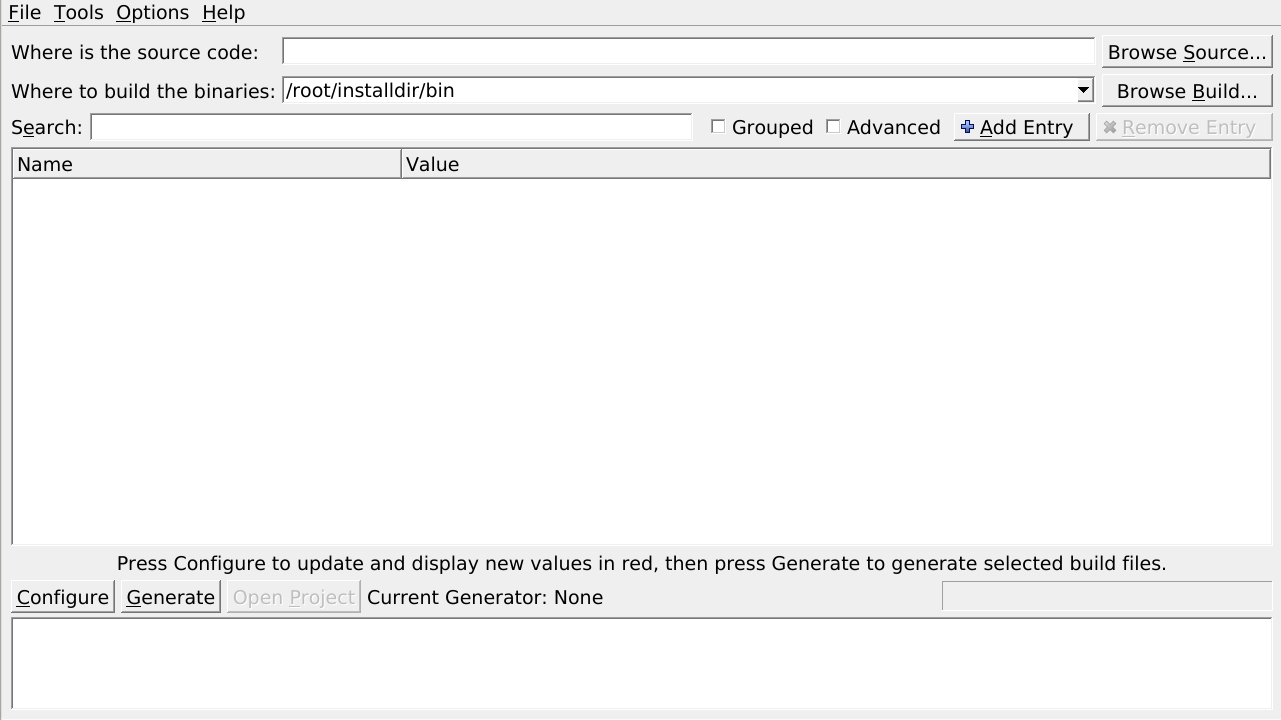


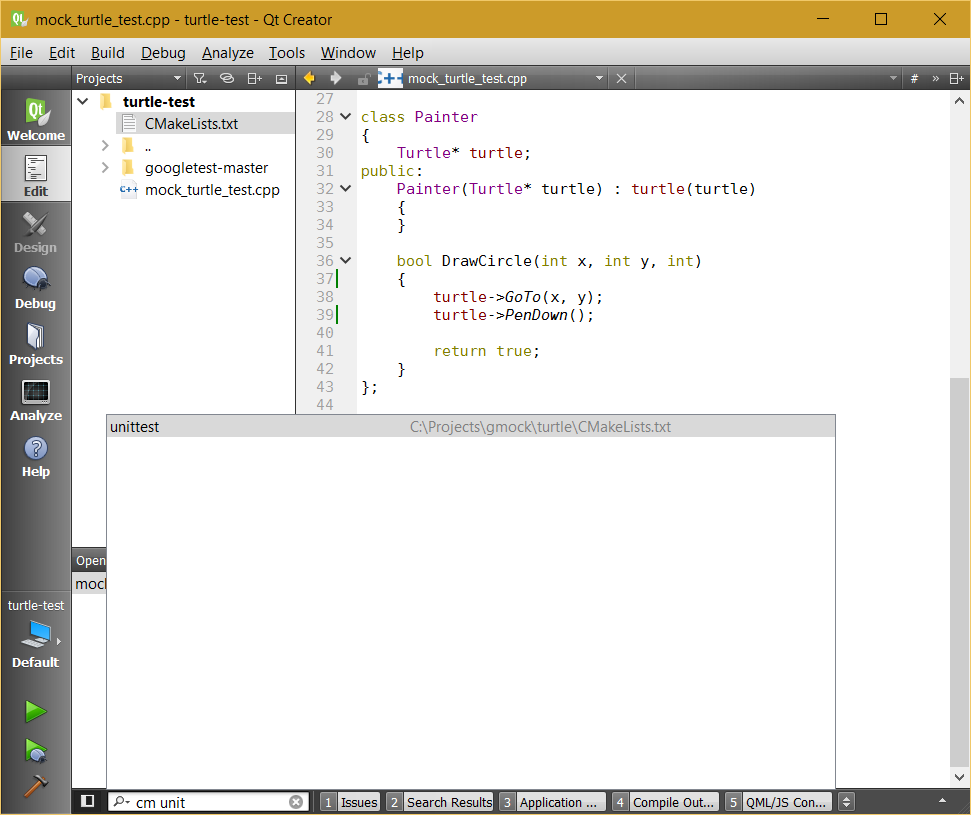
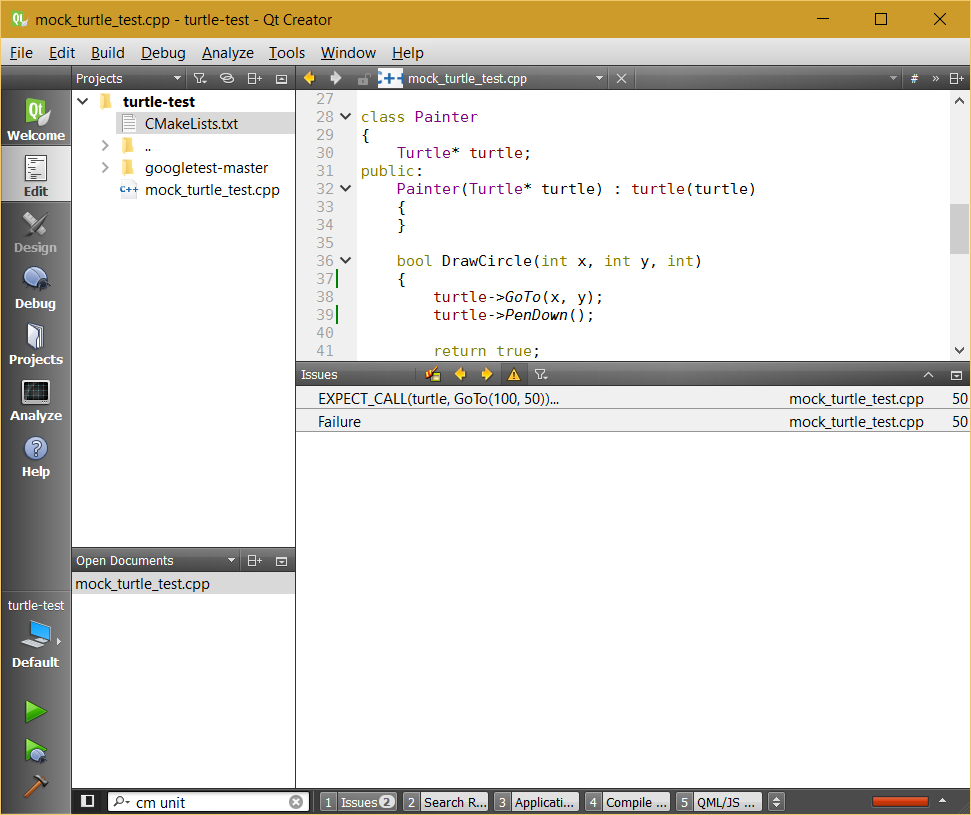
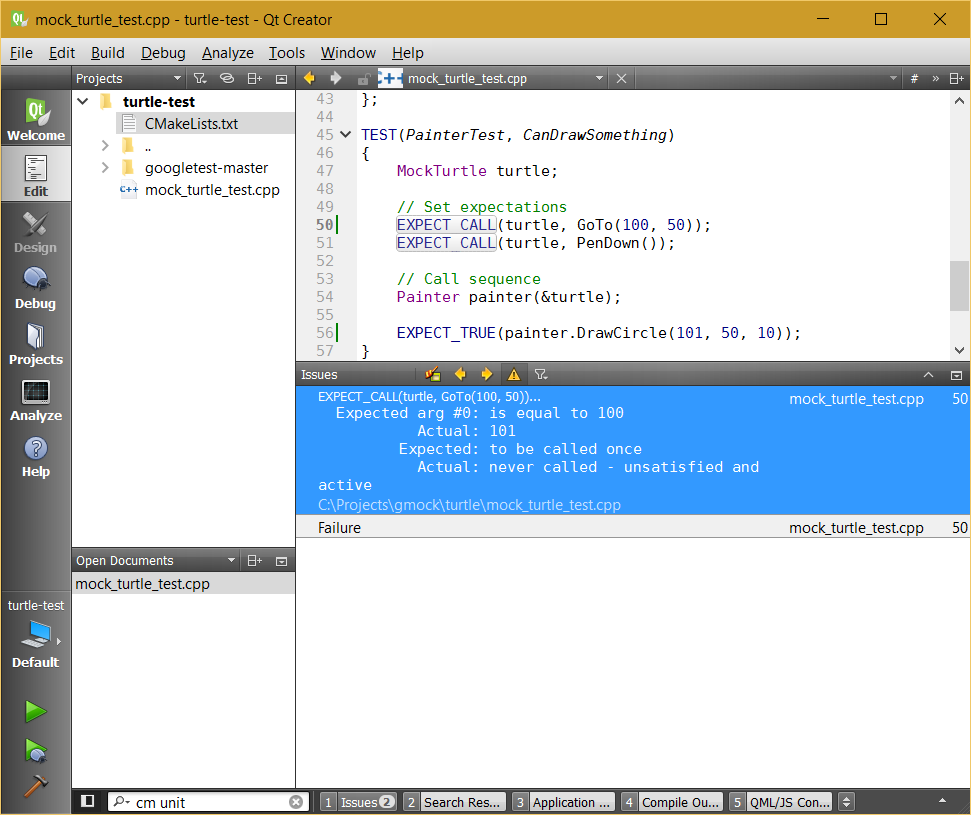

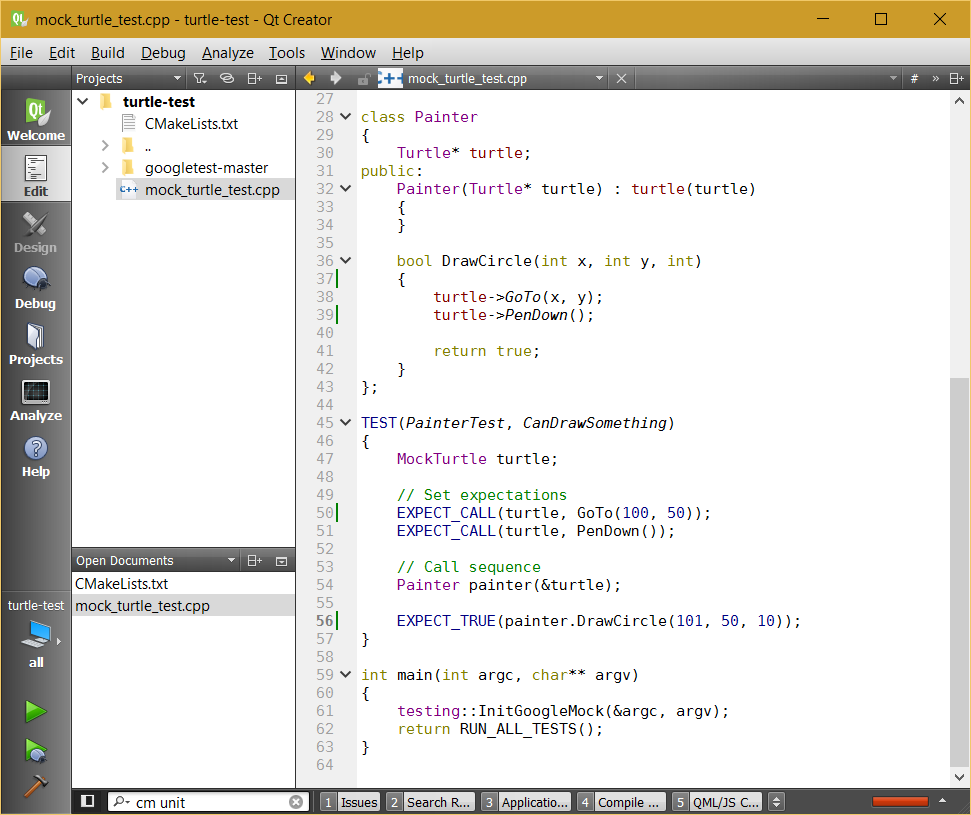


